Carriers' Guild
The Carriers' Guild is responsible for the delivery of packages and postage throughout the world of the game. There is a Carriers' Guild branch in every town, with the Headquarters in Wanda. At the guild, members called Carriers can pick up items that need to be delivered and carry them to their intended location in return for monetary compensation. The more difficult work a Carrier does for the Guild, the higher their Carrier Rank.
While the two Carriers Ventus and Nuage are both recruitable in various Scenarios in the game, only during Ventus's Scenario can the player enter Carriers' Guild branches and partake in Carrier Missions.
For a basic description of how Carrier Missions work, see the Carriers' Guild section of the Primer.
When taking on a Carrier Mission, Ventus must travel from the starting town to the target town by traveling across routes between all of the towns along the way. Each route has a set method of travel and set "distance" value. Ventus will automatically take the shortest possible route to his destination, so you can't intentionally extend your trip.
The total distance of the route is part of determining the difficulty of the Mission, the wages Ventus will be paid for the delivery, and how much the Carrier Rank may increase at the end of the Mission.
Most routes use a highroad map as the adventure to travel between towns, but you will have to travel through the Vale of Swords to move between Solophero and Serin, and you will have to travel through the Jade Forest to move between Serin and Sadovos. When moving between Gadeira, Longshank, and Vaftom, you will take a boat without having to embark on an adventure map.
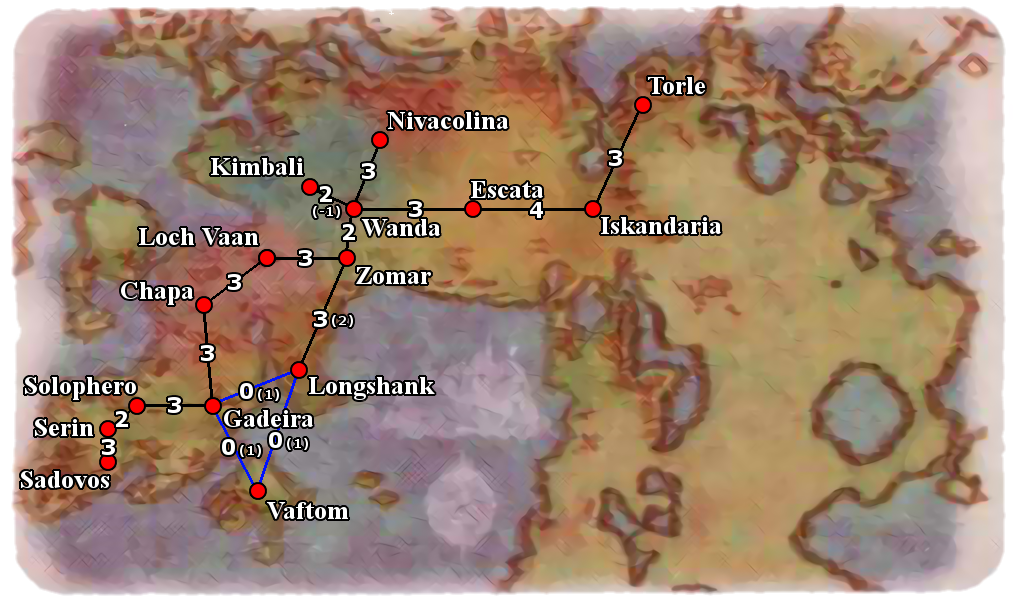
Most routes will always have the same distance no matter what, but there are a few special cases:
- When traveling between Torle and Kimbali, the distance for the route between Wanda and Kimbali is considered -1 instead of 2, making the total distance for Missions between Torle and Kimbali only 9 instead of 12.
- When traveling from Gadeira to Zomar, the distance between Longshank and Zomar is considered to be 2 instead of 3.
- When a Mission consists of nothing but a sea route, the sea route will be counted as having a distance of 1 instead of 0.
Maps for the land routes can be found in the Adventure Maps section.
A Carrier Mission's difficulty is based on a combination of the weight of the item, the value of the item, and the distance you must travel to deliver the item as per this formula:
TotalDistance * (ItemWeight + ItemValue) / 2
You may only accept Carrier Missions with a difficulty equal to or less than ten more than your Carrier Rank.
Meanwhile, Reward is based only on the distance traveled and the value of the item as per this formula:
TotalDistance * ItemValue * 100
So some Missions with similar difficulty can be worth more money if the item's weight is lower. The reward for Carrier Missions is usually insignificant to the amount of money you can obtain by finding treasures while on the road, though.
Carrier Rank shows your skill as a carrier, based on how much hard work you've put into your carrying career. As your Rank increases, you will be able to take on more difficult and more rewarding Missions.
Ventus's Carrier Rank starts at 0 when the game begins. As you clear Carrier Missions, sometimes you will be awarded points toward your Carrier Rank. The chief at the guild branch will tell you your "current Carrier Rank" when you hand over and item for delivery. This is a mistranslation, as this number is not your current Rank, but rather the amount of points that were added to your current Rank.
The amount that the Rank increases when handing over a delivery is based mostly on the distance traveled and the weight of the item carried, as per this formula:
(TotalDistance * ItemWeight - CurrentRank) / 2 + 1
TotalDistance refers to the combined distance of all routes traveled during the current Mission. ItemWeight refers to the weight of the item carried, which can be seen in the Item List or Mission Set Lists below. CurrentRank refers to your Rank before the Mission was accepted.
Because it's possible for your current Rank to exceed the distance traveled multiplied by the weight of the item carried, it is possible for the formula to result in values less than 1. In these cases, the amount of points added to your current Carrier Rank will be 0. Your Carrier Rank can never be dropped.
The Carrier Rank is shown in milestones on the screen in the form of stars that represent 10 points each (past the initial star, which represents 0) with a maximum of 10 stars; however, Carrier Rank can be any integer value between 0 and 99, so the only way to know your exact rank is to keep track of it yourself.
Raising Carrier Rank
Since Carrier Rank is based solely on the distance traveled and the weight of the item carried, the Reward and Difficulty of a Mission is not always the best indication of how well a particular Mission will raise Carrier Rank, as those also take into account the item's value.
Carrier Rank rises with weight and distance, while Difficulty rises with weight, distance, and value. You want to choose Missions that travel a long distance with a heavy item, but if the item also has a high value, it is possible that the difficulty will be too high for you to accept the mission. The best way to raise carrier rank the fastest is to seek out Missions that have items that are heavy with low value and carry them as far as possible. The best items for this purpose are the common Stone and common Armor items.
There are 48 total items possible to carry during Carrier Missions, aside from unique items that are part of Ventus's story.
Which items are available at which times are determined by each town's current Mission Set. Each item has its own weight and value which, combined with the distance traveled, determine the Difficulty, Reward, and Rank increase a Mission has.
Some items have the same name and weight as one another in the game (such as "Armor" or "Stone") but will have different values. The game does not disclose the weight or value of items, so to tell the difference between the different versions of these items, you can refer to the description given in the game. Otherwise the item descriptions exist solely for flavor; items that say things like "time limit" or "deliver while fresh" do not actually require you to do anything special or pay attention to time while delivering them.
|
Item |
Weight |
Value |
Description |
 |
Apple |
1 |
2 |
An apple a day keeps the doctor away. Deliver while it's still fresh!
|
 |
Armor (Common) |
4 |
1 |
A common defensive weapon.
|
 |
Armor (Rare) |
4 |
4 |
A legendary defensive weapon of unknown origin.
|
 |
Book (Common) |
1 |
2 |
A difficult book.
|
 |
Book (Rare) |
1 |
3 |
A dangerous item of unknown origin.
|
 |
Bottle |
1 |
3 |
A valuable item of unknown origin.
|
 |
Bouquet |
2 |
2 |
A beautiful bouquet that must be delivered before it wilts.
|
 |
Cloth Pouch |
2 |
1 |
No one knows what's inside.
|
 |
Crate |
3 |
2 |
A valuable item of unknown origin.
|
 |
Dagger |
1 |
1 |
A versatile dagger, useful for self-defense or adventure.
|
 |
Dried Fish |
2 |
2 |
An item famous in this region. You won't find it anywhere else.
|
 |
Fish |
2 |
1 |
Local fish, perfect for simmering or frying. Deliver while it's still fresh!
|
 |
Fruit |
1 |
1 |
A fairly large quantity, all packaged up.
|
 |
Gem |
1 |
3 |
Green sapphire. Light and promising.
|
 |
Glass Bottle |
1 |
2 |
Cold medicine. A valuable commodity depending on the location.
|
 |
Ham |
2 |
1 |
Processed to be well-preserved.
|
 |
Helmet (Common) |
2 |
1 |
A common defensive weapon.
|
 |
Helmet (Rare) |
2 |
4 |
A legendary defensive weapon of unknown origin.
|
 |
Herb Stock |
1 |
1 |
It's a much sought-after herb, for both cooking and medicine.
|
 |
Holy Water |
1 |
2 |
Said to be effective against the undead.
|
 |
Key |
1 |
1 |
A useful key, also a fashionable accessory.
|
 |
Lamp |
1 |
1 |
A lamp. It is currently unlit.
|
 |
Leather Bag |
1 |
1 |
A leather bag used by adventurers.
|
 |
Leather Pouch |
2 |
1 |
No one knows what's inside.
|
 |
Letter (A) |
1 |
1 |
Urgent contents. Deliver immediately.
|
 |
Letter (B) |
1 |
1 |
Appears to be a letter of great importance.
|
 |
Long Sword |
3 |
4 |
A legendary weapon of unknown origin.
|
 |
Map |
1 |
2 |
A map.
|
 |
Meat |
2 |
1 |
A tasty ingredient for the finest dishes. Deliver while it's still fresh!
|
 |
Medicinal Herbs |
1 |
1 |
|
 |
Mummy |
2 |
4 |
A saint's mummy, popular among collectors... but a burden to haul.
|
 |
New Crate |
3 |
1 |
No one knows what's inside.
|
 |
Old Crate |
4 |
1 |
No one knows what's inside.
|
 |
Perfume |
3 |
2 |
An item popular with women.
|
 |
Picture Book |
1 |
2 |
A picture book of local traditions.
|
 |
Scroll |
1 |
2 |
Appears to be a letter of great importance.
|
 |
Seeds |
1 |
1 |
Seeds from a plant.
|
 |
Shield (Common) |
2 |
1 |
A common defensive weapon.
|
 |
Shield (Rare) |
2 |
4 |
A legendary defensive weapon of unknown origin.
|
 |
Spices |
1 |
1 |
|
 |
Stone (Common) |
4 |
1 |
Appears to be used as raw material for something.
|
 |
Stone (Rare) |
4 |
2 |
It's an ordinary stone, but collectors know its value.
|
 |
Sword |
3 |
1 |
This sword may be common, but its blade has been well-honed.
|
 |
Treasure Chest |
3 |
3 |
No one knows what's inside.
|
 |
Vegetables |
1 |
1 |
Local produce, perfect for simmering and frying. Deliver while it's still fresh!
|
 |
Wine (Common) |
1 |
3 |
An item with a time limit. It can only be consumed now.
|
 |
Wine (Rare) |
1 |
4 |
Vintage wine.
|
 |
Wood Piece |
4 |
3 |
Though it appears to be a wood chip, it's fragrant potpurri.
|
Each town will only have four available item Missions available at a time. Which set of Missions is available will change when you accept and finish a Carrier Mission from that town; however, the destination location of the mission (and in turn, the difficulty, reward, and rank increase) will be randomized every time you enter the town. This means you can reset the specifics of each mission set by leaving the town and returning to it from the world map. You do not need to visit any other towns before returning to re-randomize the sets.
After completing a Carrier Mission from a town, it will move to its next set in numerical order as listed in the tables below. Once Set 4 is finished, that town will go back to Set 1.
Because Longshank, Gadeira, and Vaftom all are connected by sea routes, you can easily change which set any of the three towns are on by re-entering the town until you find a Mission that goes to one of the other two towns in the trio. Since you won't have to go on an adventure, you can finish the Mission right away to change Mission Sets.
Torle
| Set 1 |
Set 2 |
Set 3 |
Set 4 |
| Item |
W |
V |
| Armor (Common) |
4 |
1 |
| Helmet (Common) |
2 |
1 |
| Wine (Common) |
1 |
3 |
| Bottle |
1 |
3 |
|
| Item |
W |
V |
| Shield (Rare) |
2 |
4 |
| Map |
1 |
2 |
| Crate |
3 |
2 |
| Book (Rare) |
1 |
3 |
|
| Item |
W |
V |
| Armor (Rare) |
4 |
4 |
| Dagger |
1 |
1 |
| Helmet (Rare) |
2 |
4 |
| Fruit |
1 |
1 |
|
| Item |
W |
V |
| Letter (B) |
1 |
1 |
| ??? |
? |
? |
| Wine (Rare) |
1 |
4 |
| Crate |
3 |
2 |
|
Iskandaria
| Set 1 |
Set 2 |
Set 3 |
Set 4 |
| Item |
W |
V |
| Old Crate |
4 |
1 |
| Medicinal Herbs |
1 |
1 |
| Fish |
2 |
1 |
| Mummy |
2 |
4 |
|
| Item |
W |
V |
| Wood Piece |
4 |
3 |
| Leather Pouch |
2 |
1 |
| Picture Book |
1 |
2 |
| Book (Common) |
1 |
2 |
|
| Item |
W |
V |
| Armor (Rare) |
4 |
4 |
| Spices |
1 |
1 |
| Wood Piece |
4 |
3 |
| Leather Bag |
1 |
1 |
|
| Item |
W |
V |
| Spices |
1 |
1 |
| Sword |
3 |
1 |
| Medicinal Herbs |
1 |
1 |
| Shield (Rare) |
2 |
4 |
|
Escata
| Set 1 |
Set 2 |
Set 3 |
Set 4 |
| Item |
W |
V |
| Leather Bag |
1 |
1 |
| Shield (Rare) |
2 |
4 |
| Lamp |
1 |
1 |
| Armor (Rare) |
4 |
4 |
|
| Item |
W |
V |
| Seeds |
1 |
1 |
| Helmet (Rare) |
2 |
4 |
| Long Sword |
3 |
4 |
| ??? |
? |
? |
|
| Item |
W |
V |
| Fruit |
1 |
1 |
| Letter (B) |
1 |
1 |
| Leather Pouch |
2 |
1 |
| Dried Fish |
2 |
2 |
|
| Item |
W |
V |
| Bottle |
1 |
3 |
| Crate |
3 |
2 |
| Stone (Common) |
4 |
1 |
| Spices |
1 |
1 |
|
Nivacolina
| Set 1 |
Set 2 |
Set 3 |
Set 4 |
| Item |
W |
V |
| Helmet (Rare) |
2 |
4 |
| Dried Fish |
2 |
2 |
| Perfume |
3 |
2 |
| Seeds |
1 |
1 |
|
| Item |
W |
V |
| Fruit |
1 |
1 |
| Scroll |
1 |
2 |
| Bouquet |
2 |
2 |
| Ham |
2 |
1 |
|
| Item |
W |
V |
| Holy Water |
1 |
2 |
| Helmet (Common) |
2 |
1 |
| Stone (Common) |
4 |
1 |
| Cloth Pouch |
2 |
1 |
|
| Item |
W |
V |
| Leather Bag |
1 |
1 |
| Crate |
3 |
2 |
| Long Sword |
3 |
4 |
| ??? |
? |
? |
|
Kimbali
| Set 1 |
Set 2 |
Set 3 |
Set 4 |
| Item |
W |
V |
| Stone (Common) |
4 |
1 |
| Wine (Common) |
1 |
3 |
| Book (Rare) |
1 |
3 |
| Apple |
1 |
2 |
|
| Item |
W |
V |
| Dagger |
1 |
1 |
| Leather Bag |
1 |
1 |
| Scroll |
1 |
2 |
| Meat |
2 |
1 |
|
| Item |
W |
V |
| Scroll |
1 |
2 |
| Glass Bottle |
1 |
2 |
| Letter (B) |
1 |
1 |
| Perfume |
3 |
2 |
|
| Item |
W |
V |
| Helmet (Common) |
2 |
1 |
| Mummy |
2 |
4 |
| Sword |
3 |
1 |
| Map |
1 |
2 |
|
Wanda
| Set 1 |
Set 2 |
Set 3 |
Set 4 |
| Item |
W |
V |
| Long Sword |
3 |
4 |
| Cloth Pouch |
2 |
1 |
| Spices |
1 |
1 |
| Stone (Rare) |
4 |
2 |
|
| Item |
W |
V |
| Shield (Common) |
2 |
1 |
| Lamp |
1 |
1 |
| Ham |
2 |
1 |
| ??? |
? |
? |
|
| Item |
W |
V |
| Herb Stock |
1 |
1 |
| Picture Book |
1 |
2 |
| Dried Fish |
2 |
2 |
| New Crate |
3 |
1 |
|
| Item |
W |
V |
| New Crate |
3 |
1 |
| Long Sword |
3 |
4 |
| Key |
1 |
1 |
| ??? |
? |
? |
|
Zomar
| Set 1 |
Set 2 |
Set 3 |
Set 4 |
| Item |
W |
V |
| Map |
1 |
2 |
| Vegetables |
1 |
1 |
| Bouquet |
2 |
2 |
| Medicinal Herbs |
1 |
1 |
|
| Item |
W |
V |
| Sword |
3 |
1 |
| Stone (Rare) |
4 |
2 |
| Meat |
2 |
1 |
| Long Sword |
3 |
4 |
|
| Item |
W |
V |
| Vegetables |
1 |
1 |
| Lamp |
1 |
1 |
| Perfume |
3 |
2 |
| Helmet (Rare) |
2 |
4 |
|
| Item |
W |
V |
| Letter (B) |
1 |
1 |
| Holy Water |
1 |
2 |
| Vegetables |
1 |
1 |
| Shield (Rare) |
2 |
4 |
|
Loch Vaan
| Set 1 |
Set 2 |
Set 3 |
Set 4 |
| Item |
W |
V |
| Stone (Common) |
4 |
1 |
| Ham |
2 |
1 |
| Armor (Rare) |
4 |
4 |
| Stone (Rare) |
4 |
2 |
|
| Item |
W |
V |
| Seeds |
1 |
1 |
| New Crate |
3 |
1 |
| Dried Fish |
2 |
2 |
| Wood Piece |
4 |
3 |
|
| Item |
W |
V |
| Glass Bottle |
1 |
2 |
| Wine (Common) |
1 |
3 |
| Apple |
1 |
2 |
| Herb Stock |
1 |
1 |
|
| Item |
W |
V |
| Apple |
1 |
2 |
| Bouquet |
2 |
2 |
| Shield (Rare) |
2 |
4 |
| Seeds |
1 |
1 |
|
Chapa
| Set 1 |
Set 2 |
Set 3 |
Set 4 |
| Item |
W |
V |
| Perfume |
3 |
2 |
| Bouquet |
2 |
2 |
| Herb Stock |
1 |
1 |
| Letter (B) |
1 |
1 |
|
| Item |
W |
V |
| Wine (Rare) |
1 |
4 |
| Fish |
2 |
1 |
| Fruit |
1 |
1 |
| Scroll |
1 |
2 |
|
| Item |
W |
V |
| Armor (Rare) |
4 |
4 |
| Stone (Rare) |
4 |
2 |
| Picture Book |
1 |
2 |
| Key |
1 |
1 |
|
| Item |
W |
V |
| Mummy |
2 |
4 |
| Glass Bottle |
1 |
2 |
| Leather Pouch |
2 |
1 |
| Lamp |
1 |
1 |
|
Longshank
| Set 1 |
Set 2 |
Set 3 |
Set 4 |
| Item |
W |
V |
| Picture Book |
1 |
2 |
| Old Crate |
4 |
1 |
| Holy Water |
1 |
2 |
| Treasure Chest |
3 |
3 |
|
| Item |
W |
V |
| Crate |
3 |
2 |
| ??? |
? |
? |
| Cloth Pouch |
2 |
1 |
| Holy Water |
1 |
2 |
|
| Item |
W |
V |
| Wine (Common) |
1 |
3 |
| Meat |
2 |
1 |
| Seeds |
1 |
1 |
| New Crate |
3 |
1 |
|
| Item |
W |
V |
| Book (Common) |
1 |
2 |
| Book (Rare) |
1 |
3 |
| Fish |
2 |
1 |
| Old Crate |
4 |
1 |
|
Gadeira
| Set 1 |
Set 2 |
Set 3 |
Set 4 |
| Item |
W |
V |
| Mummy |
2 |
4 |
| Armor (Common) |
4 |
1 |
| Dagger |
1 |
1 |
| ??? |
? |
? |
|
| Item |
W |
V |
| Gem |
1 |
3 |
| Meat |
2 |
1 |
| Glass Bottle |
1 |
2 |
| Picture Book |
1 |
2 |
|
| Item |
W |
V |
| Apple |
1 |
2 |
| Medicinal Herbs |
1 |
1 |
| Leather Bag |
1 |
1 |
| Stone (Common) |
4 |
1 |
|
| Item |
W |
V |
| Helmet (Rare) |
2 |
4 |
| New Crate |
3 |
1 |
| ??? |
? |
? |
| Ham |
2 |
1 |
|
Solophero
| Set 1 |
Set 2 |
Set 3 |
Set 4 |
| Item |
W |
V |
| Meat |
2 |
1 |
| Sword |
3 |
1 |
| Map |
1 |
2 |
| Armor (Common) |
4 |
1 |
|
| Item |
W |
V |
| Ham |
2 |
1 |
| Wood Piece |
4 |
3 |
| Herb Stock |
1 |
1 |
| Wine (Rare) |
1 |
4 |
|
| Item |
W |
V |
| Dried Fish |
2 |
2 |
| Gem |
1 |
3 |
| Old Crate |
4 |
1 |
| Vegetables |
1 |
1 |
|
| Item |
W |
V |
| Key |
1 |
1 |
| Book (Rare) |
1 |
3 |
| Fruit |
1 |
1 |
| Fish |
2 |
1 |
|
Serin
| Set 1 |
Set 2 |
Set 3 |
Set 4 |
| Item |
W |
V |
| Medicinal Herbs |
1 |
1 |
| Wood Piece |
4 |
3 |
| Gem |
1 |
3 |
| Dagger |
1 |
1 |
|
| Item |
W |
V |
| Perfume |
3 |
2 |
| Map |
1 |
2 |
| Treasure Chest |
3 |
3 |
| Helmet (Common) |
2 |
1 |
|
| Item |
W |
V |
| Book (Rare) |
1 |
3 |
| Wine (Rare) |
1 |
4 |
| Shield (Common) |
2 |
1 |
| Sword |
3 |
1 |
|
| Item |
W |
V |
| ??? |
? |
? |
| Dagger |
1 |
1 |
| Key |
1 |
1 |
| Bouquet |
2 |
2 |
|
Sadovos
| Set 1 |
Set 2 |
Set 3 |
Set 4 |
| Item |
W |
V |
| Cloth Pouch |
2 |
1 |
| Holy Water |
1 |
2 |
| Bottle |
1 |
3 |
| Old Crate |
4 |
1 |
|
| Item |
W |
V |
| Fish |
2 |
1 |
| Stone (Rare) |
4 |
2 |
| Wine (Rare) |
1 |
4 |
| Mummy |
2 |
4 |
|
| Item |
W |
V |
| Treasure Chest |
3 |
3 |
| Herb Stock |
1 |
1 |
| Apple |
1 |
2 |
| Bottle |
1 |
3 |
|
| Item |
W |
V |
| Lamp |
1 |
1 |
| Treasure Chest |
3 |
3 |
| Scroll |
1 |
2 |
| Spices |
1 |
1 |
|
Vaftom
| Set 1 |
Set 2 |
Set 3 |
Set 4 |
| Item |
W |
V |
| Gem |
1 |
3 |
| Book (Common) |
1 |
2 |
| Treasure Chest |
3 |
3 |
| Leather Pouch |
2 |
1 |
|
| Item |
W |
V |
| Shield (Rare) |
2 |
4 |
| Vegetables |
1 |
1 |
| Letter (A) |
1 |
1 |
| Cloth Pouch |
2 |
1 |
|
| Item |
W |
V |
| Bottle |
1 |
3 |
| Key |
1 |
1 |
| Armor (Rare) |
4 |
4 |
| Glass Bottle |
1 |
2 |
|
| Item |
W |
V |
| Leather Pouch |
2 |
1 |
| Shield (Common) |
2 |
1 |
| Book (Common) |
1 |
2 |
| Gem |
1 |
3 |
|


 Carrier Routes