


-QuickNav-
[Moving & Resting]
[Adventure Menu]
[Status Menu]
[Using Skills and Interacting]
[Reel Checks]
[Monsters]
[Traps]
[Obstacles]
[Treasures]
[Turns]
[Tetra Force]
Adventure
Adventures are the main mode of gameplay in UNLIMITED:Saga. Adventures take place on Adventure Maps using a board game system to explore and interact with the environment. The player moves the party by means of a game piece token in the shape of the main protagonist of the current scenario, and interacts with the environment through the use of various Skills, similar to commands from classic text adventure games, using the menu interface. Each adventure has an objective that will allow you to clear the adventure. Clearing an adventure will take you to the Growth Panel screen where you will be awarded with Skill Panels to give to each character in the party.
While on adventures, you will encounter monsters, traps, and other hazards, as well as find valuable items and treasures. Knowing what kinds of actions are available on adventures and how to utilize them fully is important to finding success in the game.
Character Limit
The number of characters that can embark on an adventure is limited to six or seven, depending on the adventure. If you have recruited more characters than the character limit, you will be asked to decide who to take on the adventure and who to leave at the inn. The characters along the top row of icons will be the characters who embark on the adventure, and the characters in the bottom row of icons will be the characters who stay at the inn for the duration of the adventure. Press the left/right directional buttons to highlight a character from the bottom row, then press the Accept/Select button to be taken to the top row. Press the left/right directional buttons to highlight a character from the top row, then press the Accept/Select button to swap the two highlighted characters from each row. When you are ready to embark on the adventure, press the End/Misc button to begin the adventure using the characters currently displayed in the top row.
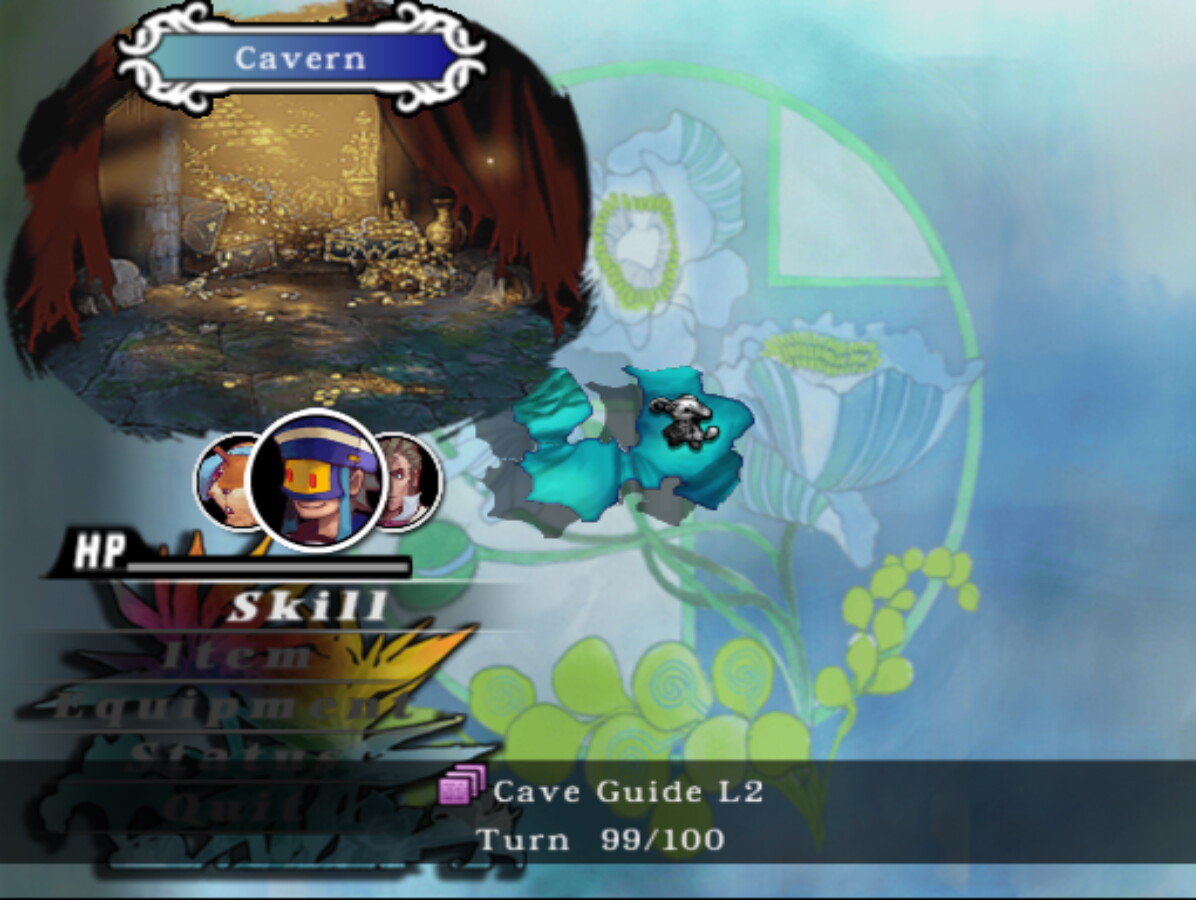
Viewing the Map and Turn Limit
Press the Help button while on the Map to view the Map Information screen. This will show a zoomed-out map that allows you to see more of the environment around you, as well as the turn limit and current number of turns spent. The range of nearby map that you are able to see at once depends on the highest current level of Road Guide, Cave Guide, or Architect amongst your party, depending on the type of location you are exploring. Familiars with these Skills also can be used as the highest level Skill. Whichever skill is the highest will be displayed at the bottom of the screen near the turn limit. Also note that only spaces you have visited can be shown in this view; spaces you have yet to see will still be hidden, even if they are within the range of your Guide Skill.
 Moving & Resting
The Adventure Map contains a series of interconnected "spaces" that form a complete map. You can see which spaces are adjacent to the space you are currently standing on by looking at the name placards of the spaces. Spaces you have yet to walk to will be labeled with only question marks, while spaces you have visited previously will contain the name of the space.
Previewing Monsters on Adjacent Spaces
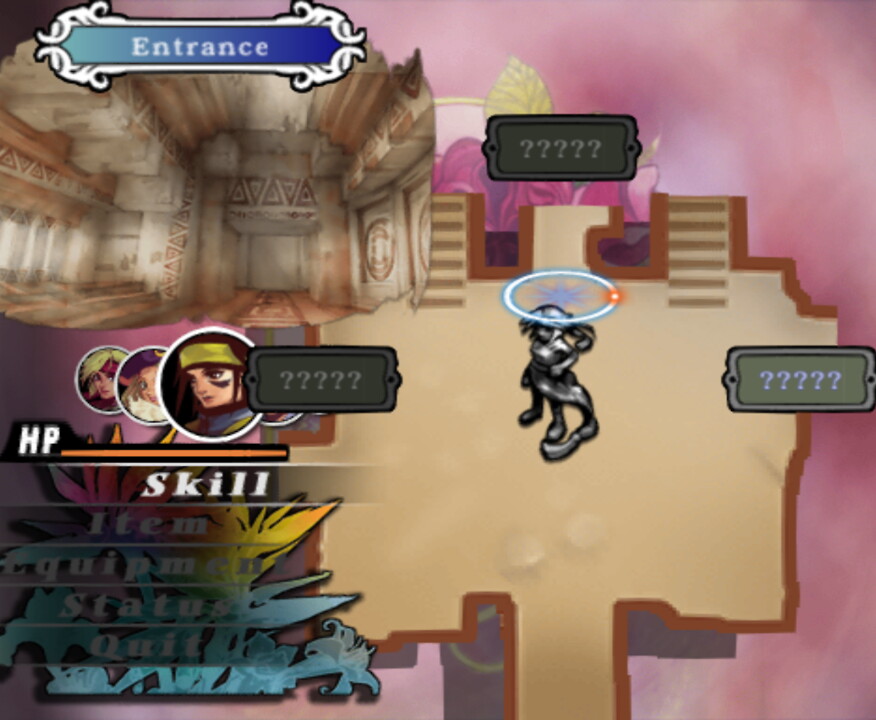
Use either analog stick to point the Crystal Hoop at any direction surrounding your current position. If you push in the direction of an adjacent space, the name placard will light up for a moment. Continue holding the Analog Stick in that direction to move the game piece to that space. Before the movement takes place, the color of the name on the placard will warn you about the monster occupants of the space:
- Names in blue indicate that no monsters are currently standing on the space you're pointing at.
- Names in yellow indicate that there are monsters on the space you're pointing at, fewer than the number of characters in the party.
- Names in red indicate that there are monsters on the space you're pointing at with equal or greater number to that of characters in the party.
While the space placard's preview color shows a clue at the number of monsters on a space at the moment, it can only recognize the number of monsters currently standing on the space. Since monsters can also get a movement phase every time the player moves, it is possible that monsters from a subsequently adjacent space may move to the space on the same turn the player does, so the placard's color does not guarantee you the number of monsters that will be there after completing the movement.
If you see the name placard's color and no longer wish to move to that space, stop pushing the Analog Stick in the relevant direction before the movement action takes place.
Resting on the Adventure Map
Throughout the adventure, your party members will lose HP by succumbing to traps and taking damage in battle. Because HP is critical to preserving LP, it is important to be able to restore it on the map by resting. You can spend a turn by pressing either the L3 or R3 buttons (push in one of the Analog Sticks). You will be prompted to confirm that you would like to rest. Resting will spend one turn and restore a bit of HP to all party members.
The amount of HP restored to each party member is based on their HP Recovery Rate, which you can see from the Status Menu. HP Recovery Rates range from A (recovers more HP at once) to E (recovers less HP at once). Some spaces on the map will contain harsh conditions which can be seen from the Skill Menu, such as "Cold" or "Noisy." These conditions make recovering HP more difficult for all characters, so HP recovery will be smaller while on these spaces. The more uncomfortable a space is, the less HP the party can recover there per turn. The party will recover HP best on spaces that are clear and comfortable.
While on the Adventure Map, you can interact with the world and check on your party by using the Map Menu located at the bottom-left corner of the screen. Press the up/down directional buttons to highlight the different choices, and use the Accept/Select button to execute a command for the currently highlighted option.
The Skill option will take you to the Skill Menu, which allows you to see more information about the space you're standing on and all of the objects you can interact with on the space (such as treasures, traps, monsters, and hazards), as well as use various Skills to interact with the things around you.
The Item option will open the inventory menu. From here you can arrange your items manually or automatically if you want. You can also select an item in the menu to choose to repair it if a party member has the Quick Fix Skill, or drop the item to remove it from your inventory. The Equipment option allows you to view and manage the party's equipped items. Items cannot be repaired or dropped from the Equipment menu, so unequip them and then use the Item command if you wish to repair or drop them.
The Status option will open the Status Menu, which contains a lot more information about the party and allows you to make some changes with them, such as selecting which Magic Tablet to study. You can also open the Status Menu with the Misc button.
The Quit option will allow you to create Quick Save Data and quit the game. After using the Quit option, the game will be saved in the Quick Save Data slot, and you will be returned to the Title Screen. Using the Continue command from the Title Menu will delete the Quick Save Data after returning you to where you left off, so this option is available for when you need to stop playing and resume later, but can't reach an inn or Growth Panel screen to save the game normally.
The Status Menu allows you to see and edit information about your party, their Skills and Arts, their Skill Panels, items' Abilities, and more. Choose a stats submenu to enter using the up/down directional buttons, and enter the menu with the Accept/Select button. Many of the submenus will be relevant to the currently highlighted character. You can change which character is highlighted by pressing the R1 and R2 buttons.
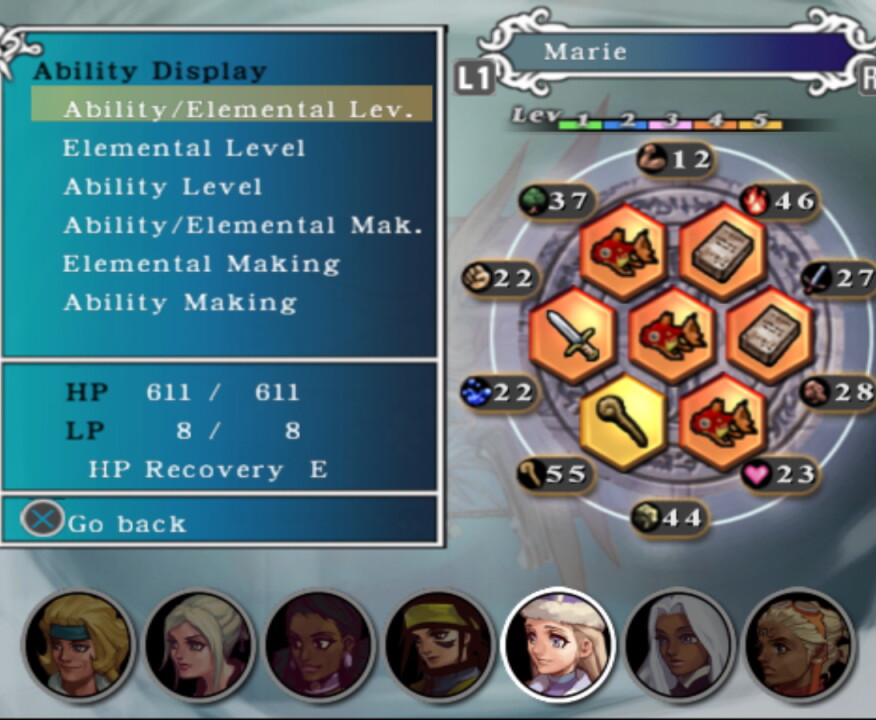
Status
The Status submenu allows you to see detailed information about the highlighted character's Ability Levels, Elemental Levels, Ability Makings, Elemental Makings, HP, LP, and HP Recovery Rate alongside their Growth Panel. For more information on what these stats mean, see the Character Growth section of the Primer.
Press the up/down directional buttons to move between which types of Levels or Makings are currently shown on the Growth Panel to the right. When viewing only one type of Level or Making at a time, a graph will be superimposed upon the Growth Panel to visually show the character's strengths and weaknesses based on their Levels or Makings.
Because Makings show how well a character can develop in different areas, it is a good idea to check on the Status Menu whenever you recruit a new character to see what kinds of Makings they have.
Magic Tablets
The Magic Tablets submenu allows you to see the current Skill Panels equipped to a character's Growth Panel. If any of these are a Magic Tablet, you can select it from here in order to study it. Use the up/down directional buttons to highlight the various Skill Panels to see their description. Press the Accept/Select button on a Magic Tablet and you will be prompted to decide if you would like to study it.
A Magic Tablet that the character is currently studying will be highlighted in yellow. Magic Tablets that have been completely deciphered by the character will have a yellow star icon next to their names. Because there is nothing more to learn from a deciphered Tablet, you cannot choose to study a Magic Tablet with a star icon next to it.
Whenever you place a new Magic Tablet Skill Panel or overwrite a Magic Tablet Skill Panel during the Growth Panel phase at the end of an adventure, the Tablet settings will be reset for that character. This means the character will stop studying any Magic Tablets they are studying. You must return to the Magic Tablets menu and choose to study a Tablet again, even if the Tablet they were studying was unaffected on the Growth Panel.
Character Position
The Character Position submenu allows you to change the order that characters stand. This will change the order they appear on the Map and Status menu, as well as the order they appear at the beginning of battle. At the beginning of a battle, the characters at the front of the formation will line up to face the enemy, while any characters beyond the Character Limit will stay out of the formation. The characters who do not line up in formation at the start of a battle will count as rested for a turn of battle and regain some HP and have a chance to recover from status effects.
Panel Bonus
The Panel Bonus submenu allows you to review the current boosts to Ability and Elemental Levels gained from Skill Panel Formation Bonuses on the character's Growth Panel. Use the up/down directional buttons to highlight the different formations to see how much they contribute to the overall Level boost, or use the Total Panel Bonus option to see the overall boost to Levels from all formations. Relevant panels to the currently highlighted option will glow on the Growth Panel display to the right so you can see which panels are affecting particular bonuses.
Sort Combos
The Sort Combos submenu allows you to look through the most recently used battle Combos. You can also sort the Combos in the list and use the Combo Save Line to ensure that Combos stay in the list.
Whenever a Combo is used in battle, it will be added to the Sort Combos List just below the Combo Save Line. By default, the Combo Save Line is at the top of the list, so new Combos will be added to the top of the list. Only seven Combos can be remembered in the Sort combos List, and when a new Combo is added to the list, the Combo at the bottom of the list will be removed.
If a Combo is used in battle and it is already on the Combo Sort List, it will be moved to the top of the list again and its number of "Times" will increase by one. This number records how many times a Combo has been used in battle without having dropped off the Combo Sort List. The higher this number is, the better chance the Combo has to reach a higher Combo Rate in battle, making it potentially more powerful.
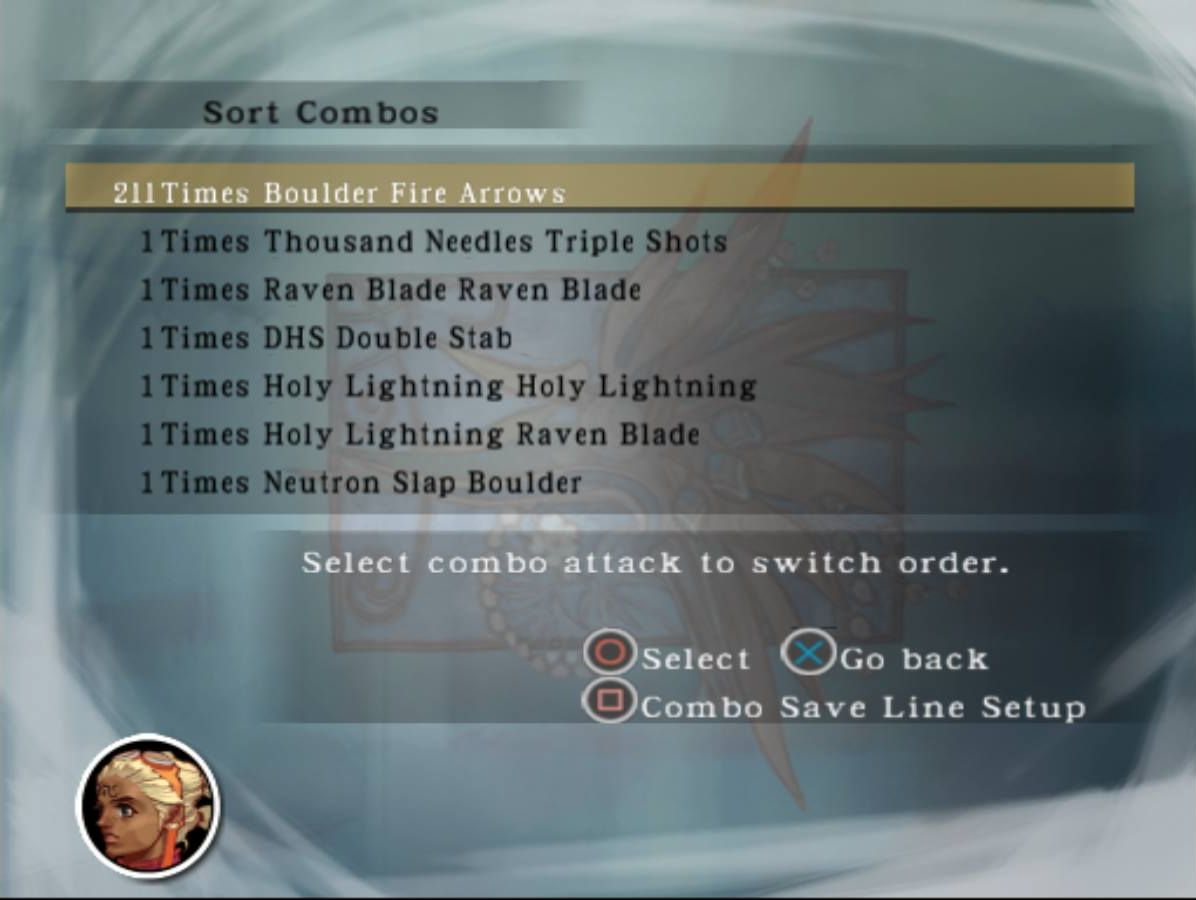
Sorting Combos and using the Combo Save Line can ensure that your favorite Combos do not get removed from the list. Use the up/down directional buttons to highlight a Combo that you would like to move to another position in the list. Press the Accept/Select button on the Combo you wish to move, and then highlight the Combo you would like to swap places with. The two selected Combos will swap places once you press the Accept/Select button again. You can reorder the Combos currently on the list as much as you'd like.
To move the Combo Save Line, press the Help button to enter Combo Save Line Setup. Once you are in Combo Save Line Setup mode, you can press the up/down directional buttons to move the Combo Save Line, and press the Accept/Select button to save its position. Because Combos above the Combo Save Line will not be affected when new Combos are performed in battle, any Combo above the Combo Save Line will stay permanently on the list and continue to increase its Times no matter how many other Combos are used between it in battle. Combos that are above the Combo Save Line will be highlighted in white text to show they are saved by the poisition of the Combo Save Line.
Skills and Arts
The Skills and Arts submenu allows you to view all of the Martial Arts, Weapon Arts, and Magic Arts that the character currently has learned. Use the R2 and L2 buttons to change which cateogry of Arts you are viewing. Press the directional buttons to highlight the various Arts in each list. While an Art is highlighted, its target type and any additional effects it has are shown at the bottom of the screen. Whenever you glimmer or study a new Art you are unfamiliar with, try looking at the Skills and Arts submenu to see if it has any special effects.
For Martial Arts and Weapon Arts, a blade icon with a square behind it represents an Art that is the base (Level 1) Art in a particular Ability Line. Arts with the larger blade icon and no square mean they are glimmered arts that can be glimmered from the base Art they are listed under. While some arts appear in more than one Ability Line, they will only appear under a single base Art in the Skills and Arts submenu.
Main Attack Setting
The Main Attack Setting submenu allows you to customize which menu appears first when selected commands for a particular character in battle. By default, the menu that appears first will be the last one you used with that character, but if you would rather a specific menu appear every time, you can select it in the Main Attack Setting submenu.
Press the up/down directional buttons to choose between the character's currently equipped Weapons, Shields, and Accessories as well as any Familiars they have. Press the Accept/Select button on one of the options to be prompted to set it as the Main Attack Setting. An option that is currently set as the character's Main Attack will be highlighted in yellow.
The Main Attack Setting submenu can only set new Main Attacks. To remove the Main Attack setting so that the battle command options behave at the default setting again, equip or unequip an item to the relevant character, or add or remove a Familiar Skill Panel during the Growth Panel phase at the end of an adventure. If you'd like to keep a Main Attack Setting, remember that the Main Attack Setting will be reverted to default (unselected) every time you change equipment or Familiars on the character, and you must return to the Main Attack Setting submenu to set it again.
Ability Help
The Ability Help submenu allows you to see descriptions for all Item Abilities (other than Weapon Arts Abilities) that exist in the game, whether or not you have encountered them before. Press the L2 and R2 buttons to change which category of Abilities you are viewing, and use the directional buttons to highlight an Ability from the list. A brief description of the Ability will be shown at the bottom of the menu.
Though the Ability Help submenu displays all Abilities that are programmed into the game, some Abilities are not actually found on any equipment in the game, so they are impossible to obtain.
The main method of interacting with the game world is through the Skills submenu from the Map Menu. While on the Map Menu, press the Accept/Select button while the Skills submenu option is highlighted to open the Skills Menu. From here, you can find more detailed information about the space you are on as well as nearby things you can see and interact with. You can also use any Skills your characters have to interact with the world around you. The Skills menu can be difficult to understand at first, as it's unlike context-based menus used in most modern games, and more like action/target-based commands used in old text-based adventure games.
The Skills menu contains a lot of information and options to be managed separately. The essential action here is choosing a Skill to perform on a Target.
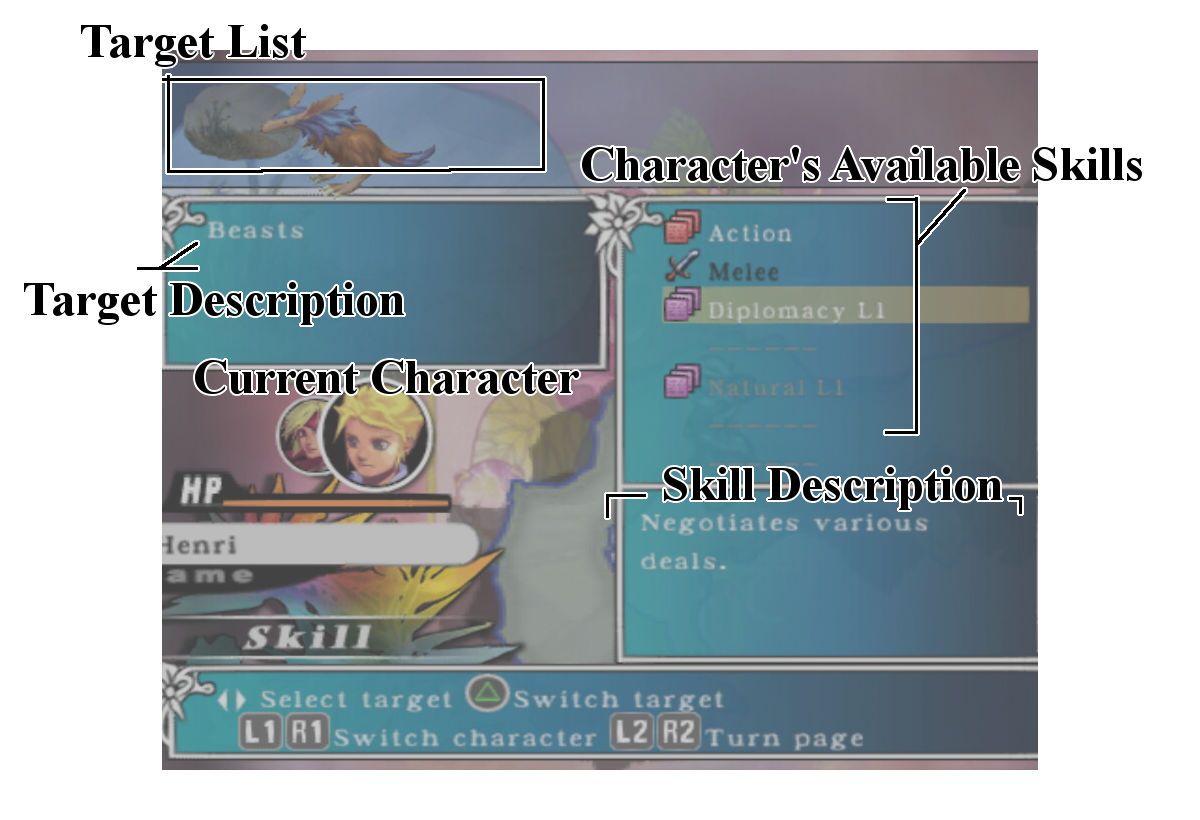
The Target List is at the top of the screen. This shows all of the things you can interact with on the current space. You can change which target is currently highlighted by using the left/right directional buttons. The currently highlighted target will be brighter in color and appear slightly in front of the other targets on the list. The first target on the list is always the space itself -- this allows you to interact with the general environment. If you press the Help button, you can switch the target list to the party members so you can target party members. This is useful when using Magic Arts such as Purify on the map. Press the Help button again to change the Target List back to the normal display. Below the Target List is the Target Description, which will give information about the currently selected target.
In order to interact with a target, you must use Skills. The Current Character that is highlighted will be the one that performs the Skills, and only their available Skills will be available in the list of Skills to choose from. You can change which character is currently highlighted in the party by using the L1 and R1 buttons.
On the right side of the screen is the list of Available Skills. Use the up/down directional buttons to choose a Skill you would like to use. All characters have the generic "Action" Ability available to them. This will interact contextually with the target; for example, using Action on a treasure chest will attempt to open it, while using Action on a monster will initiate combat with it. Using the Action command on a space will allow you to briefly look around. If there is anything special about the space or if you happen to discover something hidden, you will get a notification. The Action command is also used to pick up items and put them in the inventory.
In addition to the generic Action Skill, each character has access to Martial Arts, all of their Skill Panels, and the items that they have equipped as well as the items in the party's general inventory. Not all Skills can be used on all targets, so Skills that can be used on the selected target will be highlighted in white text. Melee and Items will always have black text, but selecting them will open up a list of Skills that can be used pertaining to those. The Melee option will always contain Punch, Kick, and Throw. Equipped items can contain Magic Arts that they channel for the character. Items in the inventory such as keys and herbs may have unique Skills like Locksmith or Restoration available to them. Most items, however, do not have any usable Skills. You can see a description of the currently selected Skill below the list of Skills.
When you press the Accept/Select button, the Current Character will use the currently selected Skill to interact with the currently selected Target. In the example image above, pressing the Accept/Select button would cause Henri to use the Diplomacy L1 Skill on the target Guckie monster. In this case, the Diplomacy skill attempts to convince the monster to leave the party alone and disappear from the map, and possibly give the party treasure as a gift.
Some Skills will be used automatically, while others will require a Reel Check to determine their success. Using any Skill, even the Action command to look around, will use one Turn.
Because there are many different lists and items to think about when using Skills, getting used to the Skill menu can take some time, even though it is the main way of interacting with the game world and map. With practice, navigating the Skill menu will become second nature, and you will be able to select Skills and interact with things quickly and easily.
As an example putting all of this together, here is how to use an herb to restore HP and LP to a party member:
- Press the Switch Target/Help button to change the Target List to show party members instead of nearby objects.
- Use the left and right directional buttons to choose a party member as the target -- the one who will receive healing from the herb.
- Use the L1 and R1 buttons to select a Current Character to administer the herb. Because all characters have access to items in the inventory, though, it doesn't matter which character you choose in this circumstance.
- Use the down directional button to scroll to the herb item in the Skills list on the right.
- Use the Accept/Select button to choose the herb, opening a context menu that shows the Skills you can use with the herb.
- Highlight the herb's "Life Restoration" Skill and press the Accept/Select button.
- The Current Character will use the herb's skill to administer Life Restoration to the highlighted character in the Target List.
Skills Usable on the Skill Menu
| Skill | Target | Source | Description |
|---|---|---|---|
| Action | Any | All Characters | Basic interaction |
| Punch/Kick/Throw | Treasure | All Characters | Breaks open a treasure chest |
| Road Guide | Map Space | Skill Panel, Familiar | Finds hidden treasure on roads |
| Cave Guide | Map Space | Skill Panel, Familiar | Finds hidden treasure in caves |
| Architect | Map Space | Skill Panel, Familiar | Finds hidden treasure in buildings |
| Obstacle Crossing | Obstacle | Skill Panel | Overcomes obstacles blocking movement |
| Swimming | Obstacle | Skill Panel | Overcomes water blocking movement |
| Eavesdrop | Map Space | Skill Panel | Shows location of nearby monsters |
| Aura | Map Space | Skill Panel | Makes it easier to evade traps and monsters |
| Sharpeye | Treasure | Skill Panel | Identifies traps and locks |
| Locksmith | Treasure, Door | Skill Panel, Key | Removes locks |
| Defuse | Treasure, Trap | Skill Panel | Defuses traps |
| Diplomacy | Monster | Skill Panel | Convinces a monster to leave peacefully |
| Fortuneteller | Treasure | Skill Panel | Predicts contents of treasures |
| Life Restorer | Party Member | Herb | Restores some HP and LP |
| Magic Arts | Various | Equipment | Various effects; depends on Art |
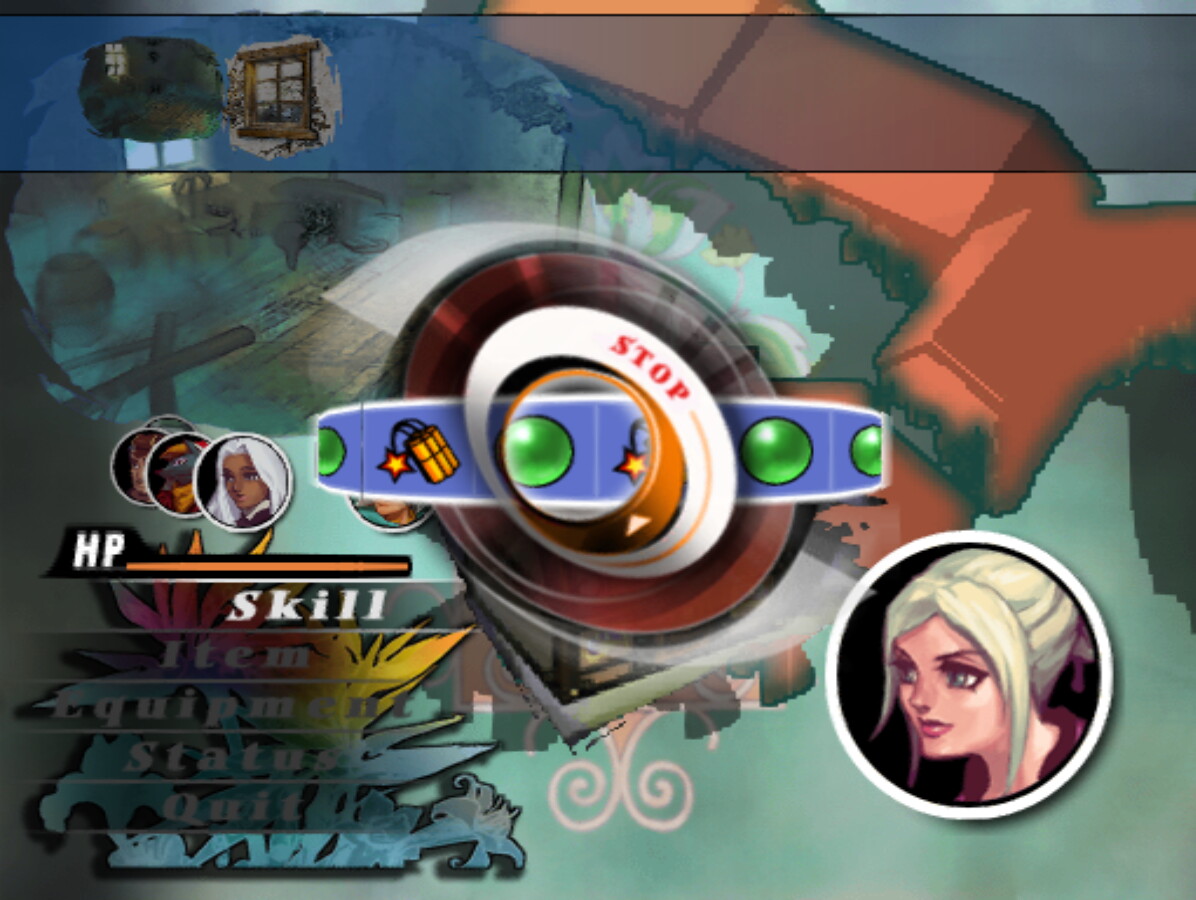
Sometimes, an action's success will depend upon a Reel Check. When this happens, a reel will appear in the middle of the screen and spin quickly. Press the Accept/Select button to stop the reel. The panel that the reel lands on will determine the rate of success of the action. The difficulty of the reel (the ratio of success to failure panels) is determined in various ways. As an example, when using the Defuse skill to remove a trap from a treasure chest, the difficulty of the reel is adjusted based on the level of the Defuse Skill Panel for the character who is using Defuse, the level of the treasure chest with the traps on it, the types of traps that are on the chest, and whether or not the traps have been identified.
All Reel Checks have three possible outcomes:
 A green orb represents success.
 A red cross represents failure.
 A lit bomb represents critical failure.
What each outcome means is dependent on the action being performed. Critical failures often offer additional punishment; for example, failure to defuse a trap on a treasure chest will simply result in nothing happening, while critical failure to defuse a trap will automatically set off all of the traps.
While the Reel will always stop when you press the Accept/Select button, there is a chance that the reel may "slip" and move a few panels ahead. Time your button press accordingly to try to aim for a safe continuation of panels and avoid critical failure. The Reel patterns will repeat, so you can watch them for a while to get an idea of where the success panels are.
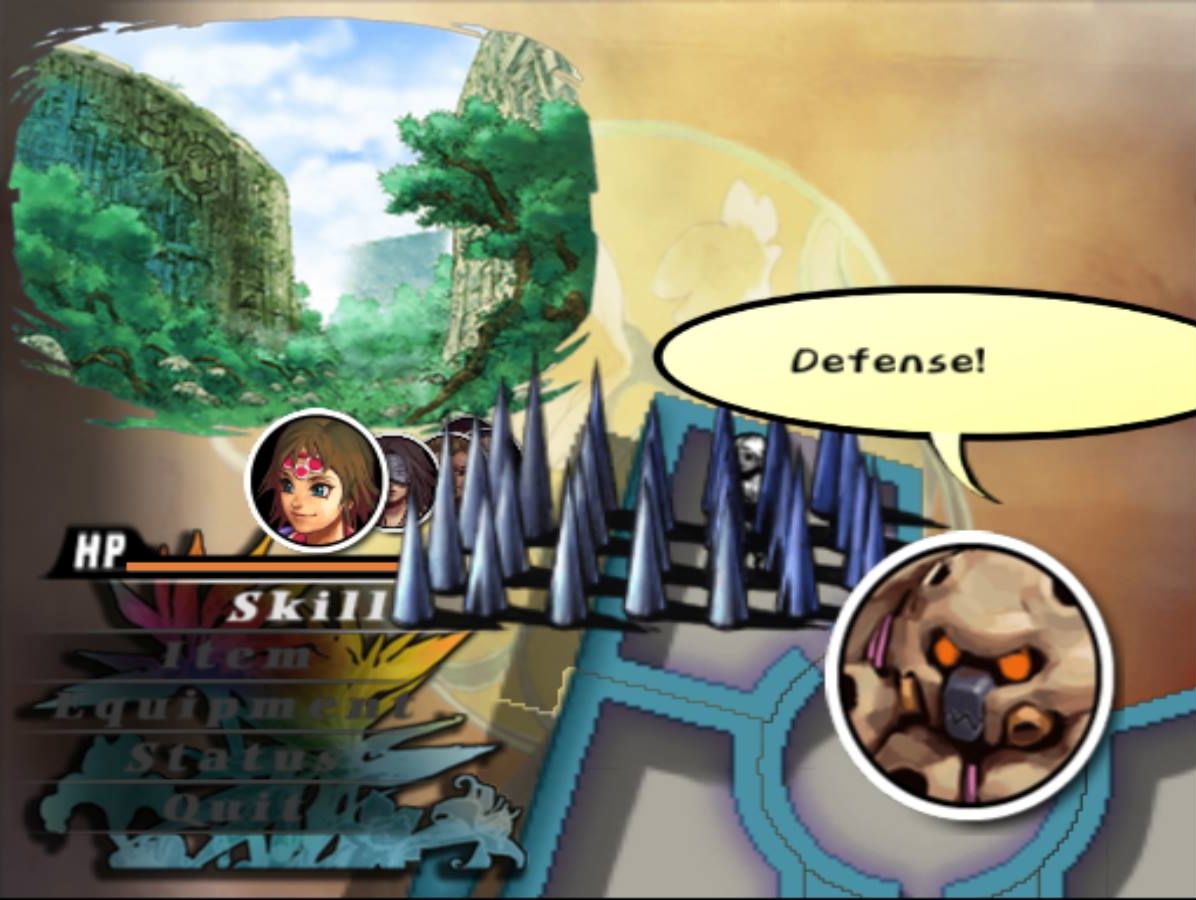
Monsters inhabit the various Adventure Maps around the world, and you will likely run into many while adventuring. Monsters take their turn after the player turn, and monsters can choose to either move to an adjacent space or stay still. At the end of a turn, monsters on the same space as the player may choose to attack. Different monsters have different behaviors, so their likelihood of attacking or moving toward the player will differ from type to type. You can reduce the likelihood of monsters initiating battles with the Aura Skill.
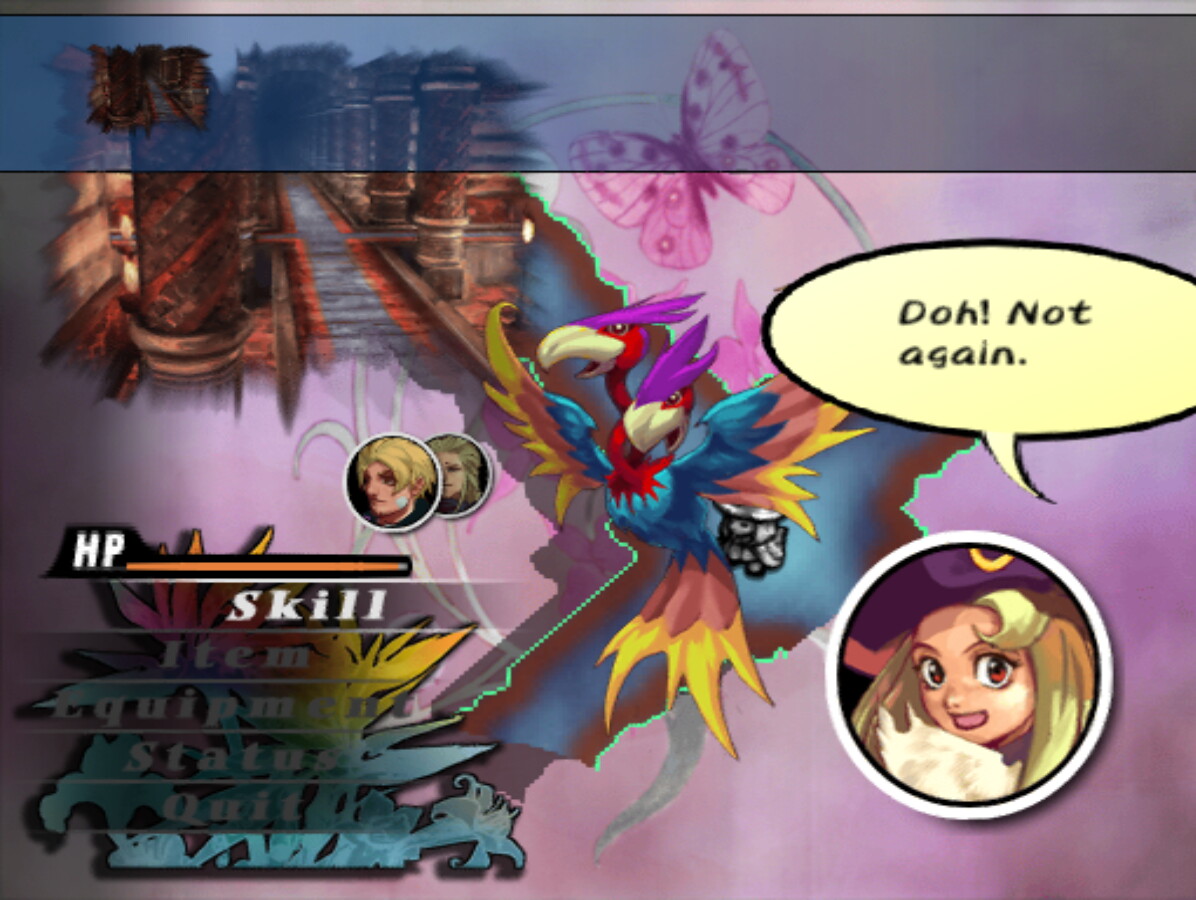
Each time you enter a map, its spaces are randomly populated with monsters. Monsters can be interacted with on the map through aggression or diplomacy. When Targeting a monster in the Skill Menu, you can use the Action command to initiate combat with the monster, or the Diplomacy Skill to attempt to convince the monster to leave in peace. After defeating a monster or convincing it to leave, monsters may leave behind a treasure chest.
When battle is initiated with a monster on the map for any reason, all monsters on the same space will try to be a part of the monster party in the battle. There is a limit, however, to how many monsters can fit in the party based on the monsters' sizes, so if too many monsters are on a space at the time a battle is initiated, some may not make it into the battle party. Monsters that do not enter battle because of this overflow will be removed from the map entirely.
You can see the locations of monsters on the map using the Eavesdrop Skill or various Magic Arts such as Detect Vegeplasts or Detect Undead. Which types of monsters can be detected and what reach the detection has will depend on which Skill you are using to detect them.
Ecosystem
Monsters have natural habitats and places they are drawn to, so the type of monsters that appear on a map is determined by the type of environment. The number and strength of monsters chosen to populate a map, however, is determined by the Ecosystem. Each monster family feeds on other monsters as part of the food chain, meaning most monsters are considered food for other monsters, too. When you defeat monsters in battle, you reduce their number in the Ecosystem. This causes not only that type of monster to decrease in appearance frequency, but also the monsters who feed upon it, as their food source has decreased. Monsters that are the prey of the defeated monsters, however, are able to thrive more since their predators have been reduced, and their appearance frequency will increase. As you defeat a family of monsters, though, they will grow more resilient and you will lure out stronger types of that monster family in the future.
Monster types can never be completely exterminated from the world, nor can any monster type become so dominant that it completely removes other types of monsters from maps. Rather than being a system for the player to keep track of and attempt to manipulate, the Ecosystem exists as a meaningful way to randomize which monsters appear on maps, so that visiting the same maps again and again can yield different experiences for the player each time without being nonsensically randomized.
Traps exist throughout the world and can cause damage to your party members. Each time you enter a map, its spaces are randomly populated with traps. At the end of every turn, when you are standing on a space that contains a trap, there is a chance the trap will trigger. The character who triggers the trap is randomly chosen. A Reel Check will be performed when the trap is triggered. Success on the check will cause the trap to be defused without any harm being done. Failure will cause the character who triggered the trap to receive HP damage from the trap. If the resulting damage causes the character to reach 0HP, or if they are already at 0HP when the trap is triggered, they will also take LP damage from the trap. Characters cannot be reduced to 0LP in this way. For more information of HP and LP, see the Battle section of the Primer. Traps can be defused by using the Defuse Skill.
The higher the level of a trap, the higher it is to avoid. Higher level traps will have higher level difficulty of Reel Checks for both triggering the trap and attempted defusing. The better level of Defuse Skill Panel the character trying to defuse the trap has, the easier the Reel Check will become.
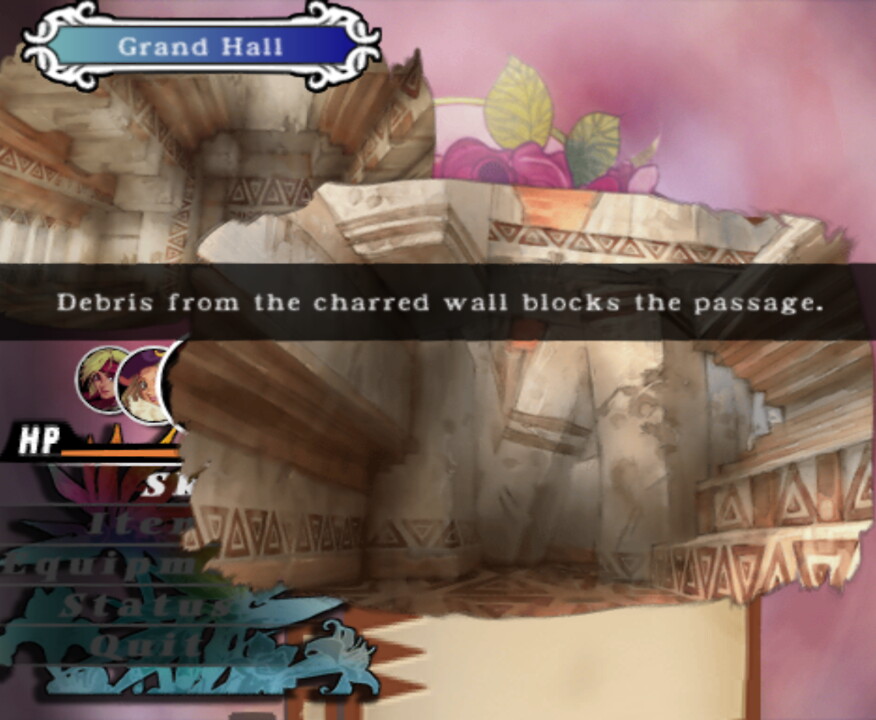
Sometimes, when you try to move to a space on the map, you will find that the passage is blocked and you cannot move. If the passage is blocked by an obstacle, you may be able to overcome it by using the Obstacle Crossing Skill (for obstacles that can be climbed) or the Swimming Skill (for water obstacles that can be swum over).
Obstacles that block movement will appear as targets on the Skill Menu for the space that they prevent movement from. After using either the Obstacle Crossing or Swimming Skill successfully on the Obstacle, it will be removed from the map, and you may freely move in the direction that was blocked by the Obstacle. Note that succeeding at Obstacle Crossing or Swimming only removes the Obstacle from the space you are standing on. If there is, for example, a river blocking movement between Space A and Space B, when you use the Swimming Skill to remove the obstacle while standing on Space A, you will be able to freely move from Space A to Space B, but to move from Space B to Space A, you will need to use the Swimming Skill to remove the Obstacle from Space B. Once an Obstacle has been removed from a space, however, it stays removed as long as you remain on the current map. Leaving the map and returning will cause all Obstacles to be set again.
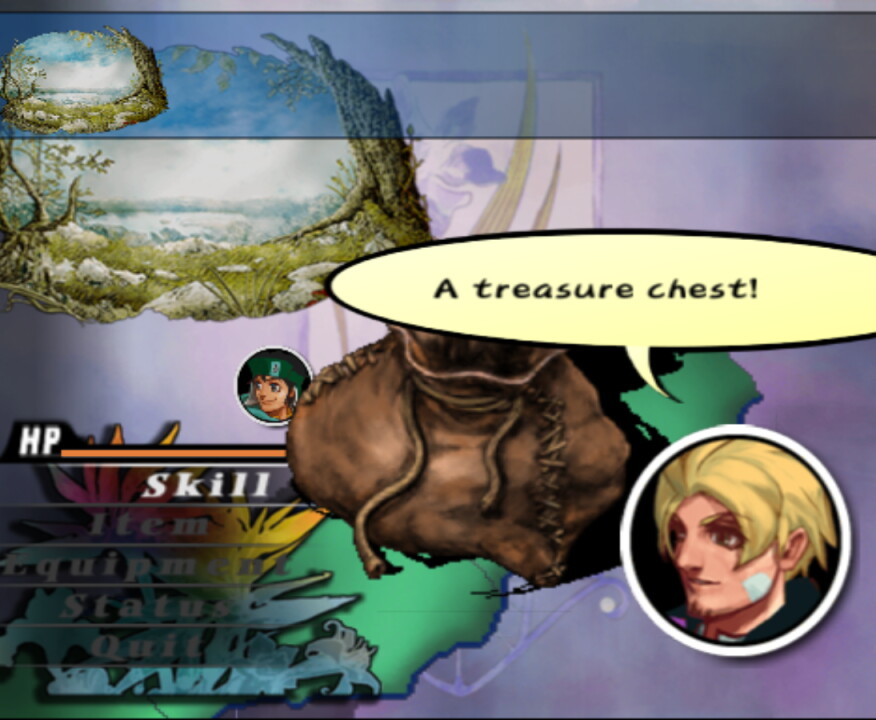
Treasures are found on Adventure Maps and can come in many forms. Some items are just lying on the ground and can be picked up using the Action command from the Skill Menu. Other items are contained in Treasure Chests. Treasure chests can appear as traditional wooden boxes, leather pouches, or corpse remains. You can use the Action command on a Treasure Chest to open it, but Treasure Chests may contain locks or traps that may hinder your progress or even punish you for attempting to open it. You can use the Sharpeye Skill to identify the locks and traps on a chest before opening it.
 A question mark icon in the treasure chest's description from the Skill Menu indicates that the treasure chest has yet to be identified with the Sharpeye Skill.
 A magnifying glass icon indicates that a treasure chest has been successfully identified with the Sharpeye Skill. If the treasure chest has any traps or locks on it, they will be identified with icons following this icon.
Upon entering a map, its spaces are randomly populated with hidden treasure chests. Chests will not always be visible right away. A character in your party may notice a hidden chest randomly, but often they will go unnoticed. You can use the Road Guide, Cave Guide, or Architect Skill depending on the type of map you are on to thoroughly search a space. If there is a hidden treasure, these Skills will find it without fail. You may also use the Skills through a Familiar that knows them.
There are also some Treasure Chests that are an existing part of the world and are not randomly generated. These chests have fixed locations and levels, and sometimes even have fixed contents. These chests do not need to be noticed by a character in the party because they will be seen as soon as you step on a space containing them. Unlike the randomly placed hidden chests, fixed chests will simply be shown to the player and a party member will not exclaim that they have found it. You can remember these locations to find the treasure again on subsequent playthroughs. Once a fixed treasure chest has been opened or destroyed, it will not appear again for the rest of the playthrough.
Locks
There are two types of locks a treasure chest can have: normal locks and magic locks. It is possible for a chest to have both types of locks on it at the same time.
 Chests that are locked normally can be opened with the Locksmith Skill. Higher level chests will be more difficult from which to remove locks, but the higher level of Locksmith Skill Panel the character has, the easier the Reel Check will become.
 Magic locks are similar, but must be dispelled using Magic Arts. A variety of Arts can be used, but many Arts cannot be used. In general, the Art must be able to damage the magic barrier on the chest, so Arts that can also damage enemies in battle will usually work on chests. The Reel Check difficulty, like with normal locks, will be based on the level of the treasure chest and the character's corresponding Elemental Level, so if you have many characters with many Arts available, use one from a character who has a high Elemental Level for the respective Magic Art.
Traps
Treasure chests can have a variety of traps on them, all of which can be harmful to the person trying to open it. Traps will trigger if a character tries to open a chest without defusing the traps, or when a character critically fails at unlocking, defusing, or fortunetelling the chest. These are the types of traps you may encounter on a treasure chest:
 Needle Trap: Fires small needles that cause minor damage
 Poison Trap: Emits a harmful poisonous substance that causes damage and may inflict Poison
 Explosion Trap: Creates a powerful explosion that damages characters and destroys the chest and its item
 Mimic Trap: Summons a Treasure Slime to battle
If a trap causes damage to a character to reduce them to 0HP, or if the character is already at 0HP when taking damage from the trap, they will additionally take LP damage. Characters cannot be reduced to 0LP in this way. For more information about HP and LP see the Battle section of the primer.
Breaking Chests
An alternative method for opening chests is to break them open using Martial Arts or Weapon Abilities. You can use the Punch, Kick, or Throw Skills to attempt to break open any treasure chest, as well as attacking Abilities from Weapons currently equipped to the character attempting to break the chest. After a successful Reel Check, the chest will be opened, but there is a chance of destroying the item inside in the process. If the chest contains money, there is a chance that some or all of the money will be lost when breaking the chest open.
Successfully breaking open a chest will ignore any locks and traps on the chest and immediately open it, allowing you to bypass them without having to use the related Skills.
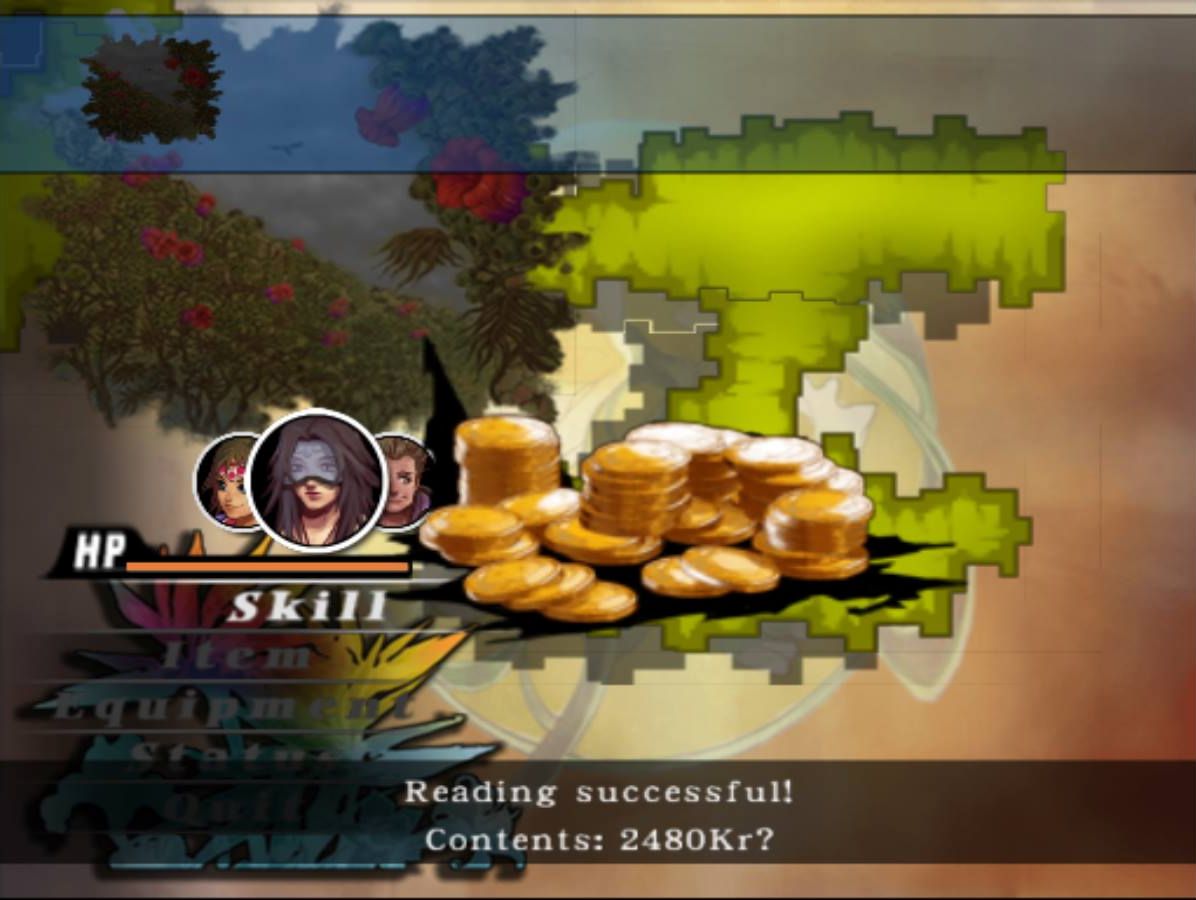
Fortunetelling
Fortunetellers have the ability to predict the contents of a treasure chest without opening it. After a successful reading, the level of the treasure chest will rise, and the fortuneteller will guess the contents of the chest. If the chest is opened at that moment, the fortune is guaranteed to be accurate. Failure will cause the chest to lower in level, and the fortuneteller will not be able to get an accurate reading on the item within. Critical failure will cause the chest to open, bypassing locks while triggering all the traps on the chest, and reducing it to level 1, giving a common, low-value item as the contents. The difficulty of the Reel Check for fortunetelling is based on the level of the Fortuneteller Skill Panel and the current level of the treasure chest.
Adventuring uses a turn-based system. Most actions such as walking, resting, or using Skills will expend one turn. After a turn is spent, some events may trigger, and all monsters on the map will get to spend one turn as well. You can check how many turns have been used in the current adventure as well as the Turn Limit if it exists by pressing the Help button.
The flow of turns on the map is as follows:
- The player takes an action to complete their turn.
- Any immediate results of the player's action take place.
- If the number of turns spent is equal to or exceeds the Turn Limit, the adventure is failed immediately and the party returns to town.
- If the adventure is not failed, characters notice the environment around them and may discover hidden treasures.
- Monsters take their turn and may move to new spaces.
- Any monsters on the same space as the player after the monster movement phase will be noticed by the characters and shown on the screen.
- Each monster on the same space as the player has a chance to attack the player.
- The turn fully ends and the next turn begins, awaiting input from the player. If a "retry" option is available for a used Skill, it will be presented at this time.
You will not use turns by managing items and equipment (including Quick-Fix), using the Status Menu, or viewing the full map with the Help button. Moving, resting, and using any type of Skill at all from the Skill Menu will use a turn. Being attacked by a monster does not cost a turn, but additional rounds of combat beyond the first will also cost turns in the adventure.
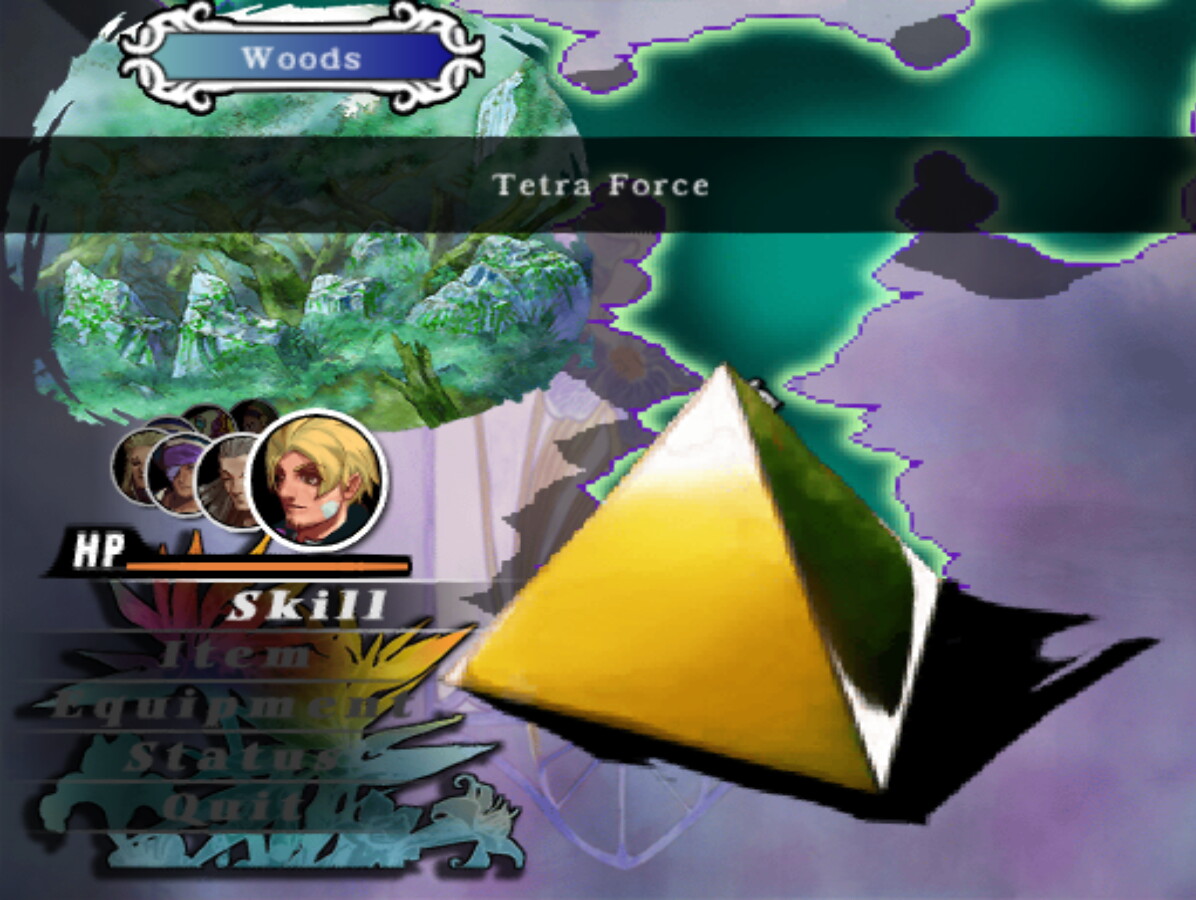
Tetra Force is a mysterious and very rare item that sometimes can be found at The Seven Wonders. Using a Tetra Force allows the party to grow and develop without having to clear an adventure.
When using the Tetra Force, the party will be able to develop their Growth Panels as if they had cleared an adventure. You will be allowed to save the game afterward, as well, and even the Market Rank may rise. Instead of the adventure finishing afterward, however, the party will be returned to the Tetra Force to continue the Seven Wonders adventure where they left off.
The Tetra Force can be used many times while visiting a wonder, but each time it is used, the party must be weaker than before. If the Tetra Force will not allow you to use it, it means the party needs to lose more LP overall. There is no limit to how many times a Tetra Force may be used, but the maximum amount of LP the party is allowed to have before using it will continue to lower. Eventually it will reach a point where it will not lower any more, but the party will be required to have very low LP every time the Tetra Force is used after that.