


-QuickNav-
[Inns]
[Shopping]
[Blacksmiths]
[Carriers' Guild]
[World Map]
Towns & Amenities
Towns are where you will do preparations between adventures, from buying and selling items, to gathering information from the people you meet. Inside a town, you can press the directional buttons to move between the available options in that town. Press the Accept/Select button to choose an option.
 Inns
Inns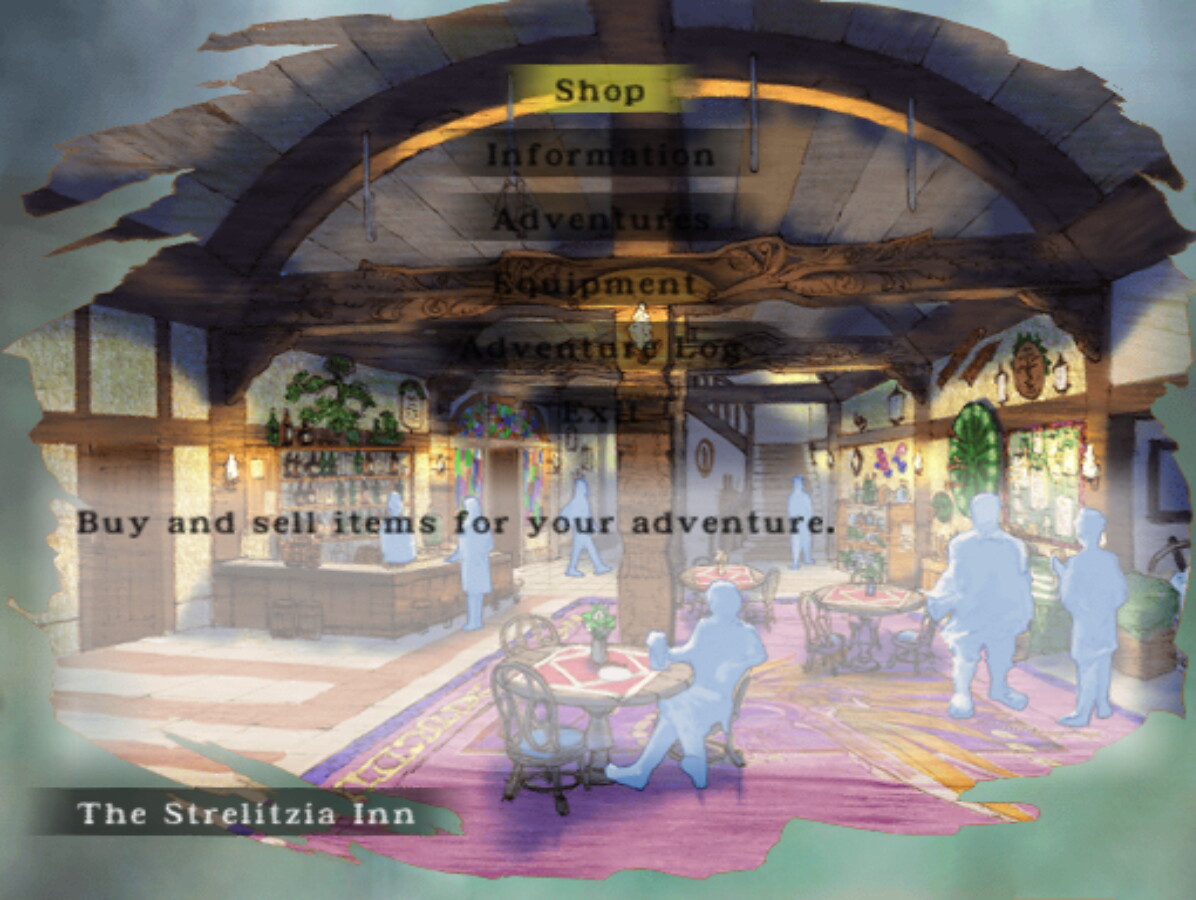
Inns are the center of most town activity, as they are a gathering place for merchants and travellers. While inns may have different names and appearances throughout the world, each inn in the game has the same basic functions for adventurers.
The Shop option allows you engage in item trade. Some towns use money and you may buy or sell items using Crowns (Kr), or you may barter with the items in your inventory to trade for an item instead. Some smaller towns only engage in trade, so you cannot use money in those places. Because you can use some Skills for bartering, you can also see characters' Skills in the shop menu.
The Information option allows you to talk to other visitors at the inn to gather information. Sometimes you may not learn much, but sometimes meeting people through the Information option is crucial to progressing in the game, so be sure to check it out each time you get to a new town or are not sure what to do next.
The Adventures option allows you to embark on a new adventure. Each town has nearby locations of interest that you can explore or help someone out, so the adventures available from each inn will be different. As you progress in the game, more adventures can become available in towns where they were not available before, so check back now and then to see if there's anything new you would like to try. If there is an adventure that is the next part of the main character's story, it will be available from all inns at all times.
The Equipment option allows you to view the current equipment of all of your party members, as well as equip or remove items from them. This is also the only way to see your inventory while in town.
The Adventure Log option allows you to save your game to a save slot on the Memory Cards in Slot 1 and Slot 2.
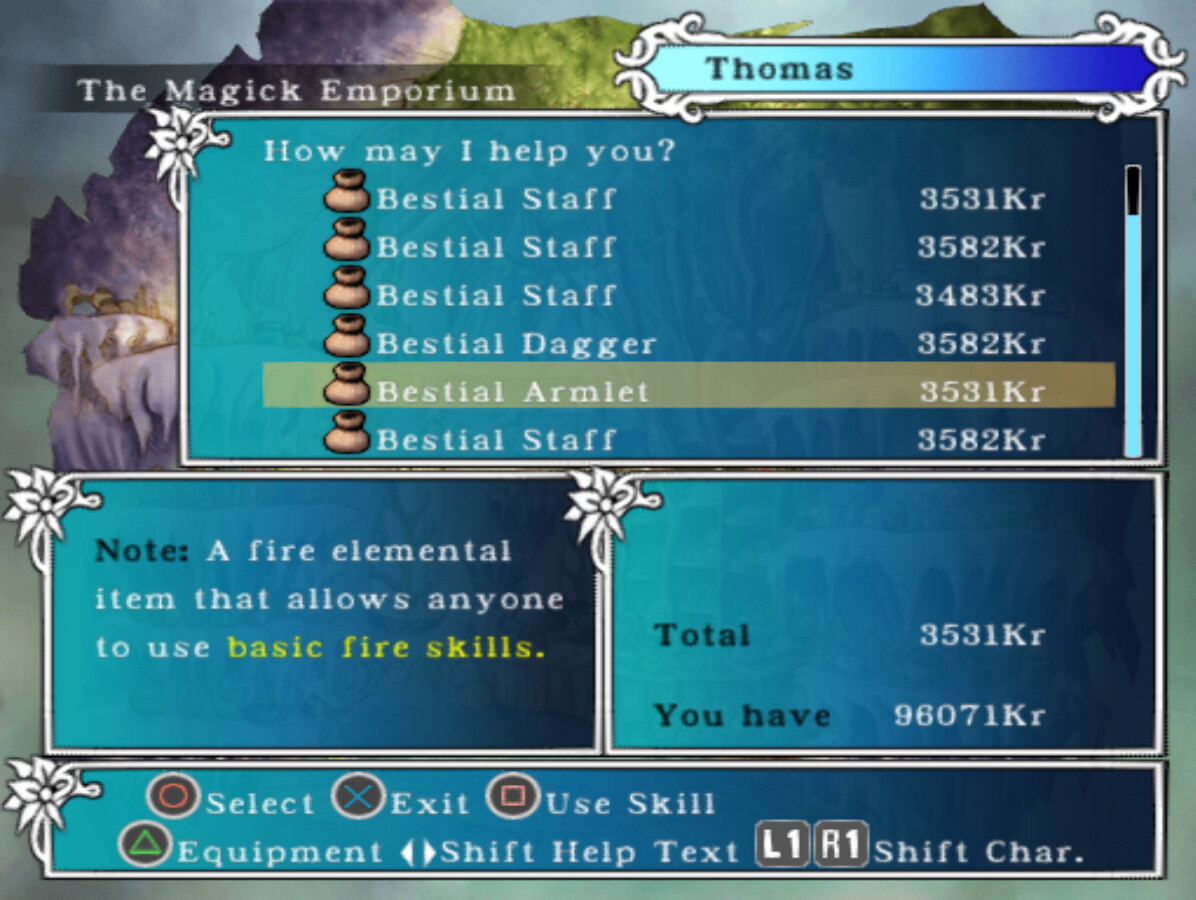
Shopping is the main method of obtaining new items for your adventure inventory. You can access a town's market through the "Shop" option in the town's inn, and in some towns there are also magic shops which sell items that channel Magic Arts. Shops' inventories will change at the end of every adventure. Shops' inventories are decided at random. The chance of rarer items appearing in shops increases as the Market Rank increases. Every time you buy items in a shop, you contribute to the Market Rank. If you've spent enough to boost the Market Rank, it will raise to the next level at the end of the next adventure.
There are two methods of obtaining a new item from a shop: purchasing with money, or bartering with items. When you press the Accept/Select button on the item you want to buy, you will be given an option to purchase for the visible price, or to try bartering instead. Some shops only allow bartering, so you must barter with items at those shops.
When purchasing an item with money, the total price will be subtracted from your current funds, and you will receive the item. When bartering, you will be taken to a bartering negotiation menu. The negotiation menu will show your current inventory, and you can select items using the Sell/Don't Sell button to add or remove items from your current offer. Items you are currently offering will have a check mark next to their name. In towns that use money, the cost of your total offer must match or exceed the price of the item. In towns that only use bartering, items will instead contribute to the exchange rate. The total exchange rate of your offer must normally meet 100 in order to trade for an item. Once you are satisfied with your offer and have met the required price or exchange rate, press the Accept/Select button to finalize the offer.
While on the main shopping menu, you can use various Skills to affect the exchange of goods and money. You can change which character is participating in the exchange by pressing the L1 and R1 buttons. The name of the active character will be displayed in the top-right corner of the menu. Press the Use Skill button to have that character use a Skill. There are three different Skills relevant to shopping.
"Negotiate until he cries" will lower the price of all of the items in the shop. If this shop does not use money, it will lower the required exchange rate when bartering. To negotiate for lower prices, a character needs to have the Monger Skill.
"Buy at a higher price to show off" will raise the price of all of the items in the shop. If this shop does not use money, it will raise the required exchange rate when bartering. This is useful if you're looking to raise the Market Rank. To buy items at higher prices, a character needs to have the Maharaja Skill.
"Just show us rare items" will allow you to see a few more items for sale that were previously hidden from the shop's inventory. To see additional shop items, a character needs to have the Artiste Skill.
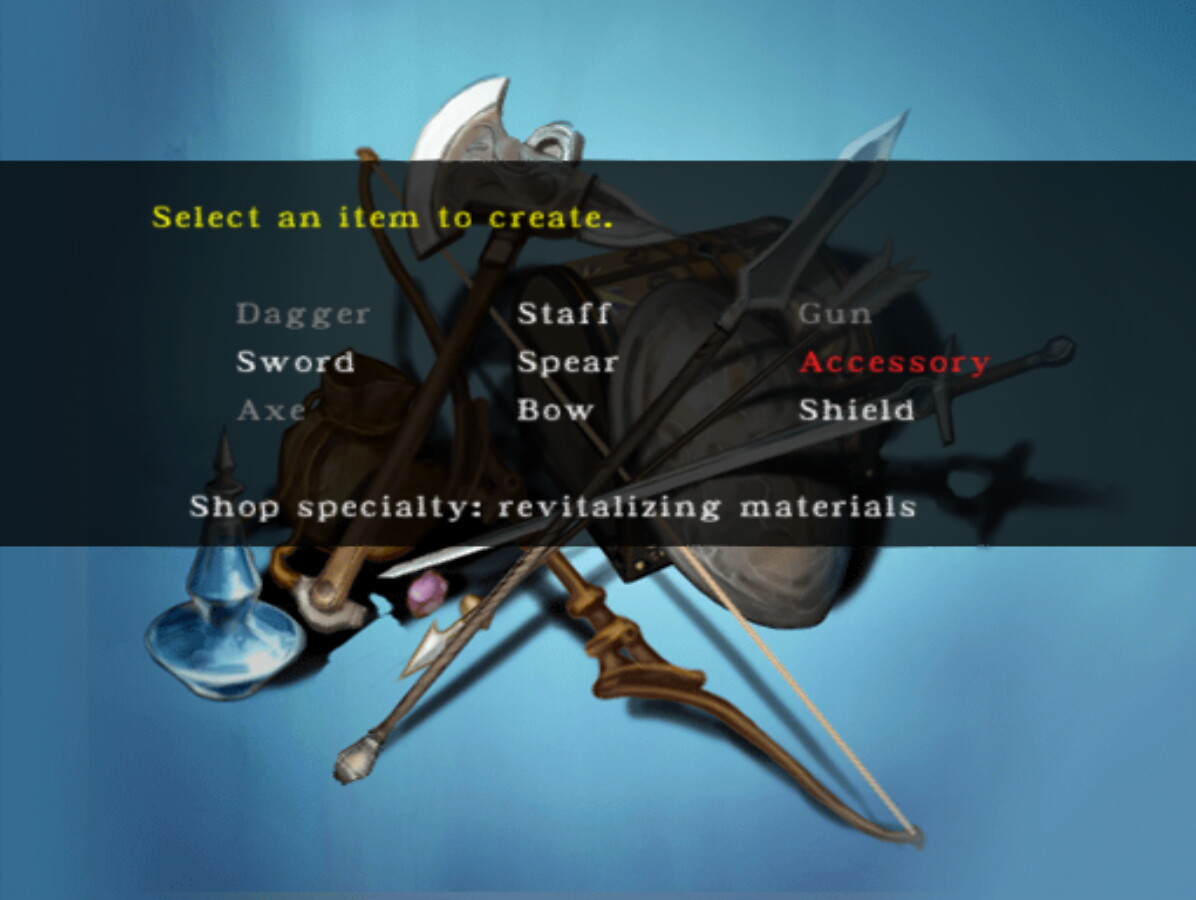
Some towns have a blacksmith where items can be crafted or repaired. Blacksmiths work with weapons, accessories, and shields, though each town's blacksmith has only a specific set of items it can work with. No blacksmiths will craft new guns; guns can only be repaired at a blacksmith. When crafting or repairing items, you will choose a Base Item and an Additional Item to use in the smithing. Except for the Base Item in a repair, which remains the same, the items will be reduced to their material for the sake of crafting. So using a Silver Armlet is not any different from using a Silver Sword as your Additional Item, for example.
Crafting and Repairing
To repair an item, select the type of item you would like to repair. Choose the item that you want to repair as the Base Item first. Then you can choose an Additional Item to use for the repairs. The material of the Additional Item determines how much durability is restored to the item during the repair.
To craft a new item, select the type of item you would like to repair. Choose an item that you want to use as the Base Item. The material of the Base Item will be the material of the resulting item, unless you happen to discover a recipe for another material. Make sure you do not choose an item of the same type you are trying to create, or you will simply repair the item. The Additional Item will decide how much extra durability the new item will have. For weapons, the Additional Item will also affect which Abilities the item will have, so try different combinations.
If certain combinations of items are used as the Base Item and Additional Item while repairing or crafting new items, the material of the resulting item may change. Some of these recipes will only work some of the time by chance, while some will work every time. The game will not record any recipes you discover, so if you find a new material, make sure to remember which items you used to create it.
Modifying Abilities
When crafting or repairing an item at the blacksmith, the item will usually have the same number of Ability Slots released as the Base Item. Sometimes, though, the blacksmith will do exceptionally well or exceptionally poorly on the job. This may cause an additional Ability Slot to release on the item, or it may cause an Ability Slot to unrelease. Different combinations of materials may increase or decrease the chance of Ability Slots being released or unreleased.
There is also a chance to mutate one of the Abilities on an item if you use a bestial material that has an exceptional amount of elemental energy as your Additional Item, allowing the resulting item to channel Magic Arts.

The Carriers' Guild is a place for Carriers to accept missions, drop off packages, and review their current mission orders. Because only Carriers are allowed inside the guild halls, the Carriers' Guild is only accessible during Ventus's scenario. Carrier Missions involve moving packages from one location to another, and upon reaching the destination, you will receive a monetary reward for your efforts.
If you are not currently in the middle of a Carrying Mission, you can accept a new one from the Guild. Use the Choose Delivery option to see a list of available jobs from the current guild hall. Each job will have a destination, difficulty rating, and commission payout. The destinations may be places you have not visited yet, so you can use Carrier Missions as a way to discover new towns on the World Map. If the difficulty rating of the job is too high, the guildmaster will not allow you to accept the job. The higher your Carrier Rank, the higher difficulty jobs you can accept. The payment will be given once you reach the destination.
If you are currently in the middle of a Carrying Mission, you can visit the guild to check up on your order. If you are not at the destination, you can review the order's details that you were given when you accepted the job. If you are at the destination, you can choose to Hand Over Delivery to complete the mission. Upon completing a mission, you will be given the money owed to you, and you will also be ranked on your progress. The guildmaster will tell you your "current rank," which refers to the rating you were scored for the current delivery that you turned in. The higher the difficulty and the further you traveled, the higher an individual delivery's rank will be. The more rank points you accumulate through completing deliveries, you will increase your Carrier Rank, which is shown as stars in the bottom-left corner of the Guild menu. The higher your rank, the higher difficulty deliveries you will be allowed to accept.
Once you accept a Carrier Mission for delivery, you may not embark on any adventures nor may you freely roam the World Map until the package has been delivered. The "Adventures" option in the inn will be unavailable. Exiting town will embark on the next route of the Mission.
If you leave a town, you will be taken to the World Map. From the World Map, you can travel instantly to any town you have previously visited or discovered. By default, the World Map will always be fully zoomed in every time you open it, so you must zoom out by holding down the Cancel button in order to see other towns. Town icons are incredibly small and difficult to see simply from looking at the map, so the easiest way to find a town is simply to press the up/down directional buttons while fully zoomed out to navigate through the list of towns available to you.