


-QuickNav-
[Level Formula]
[Growth Rates]
[Formation Bonus]
[Growth Example]
Growth Panel
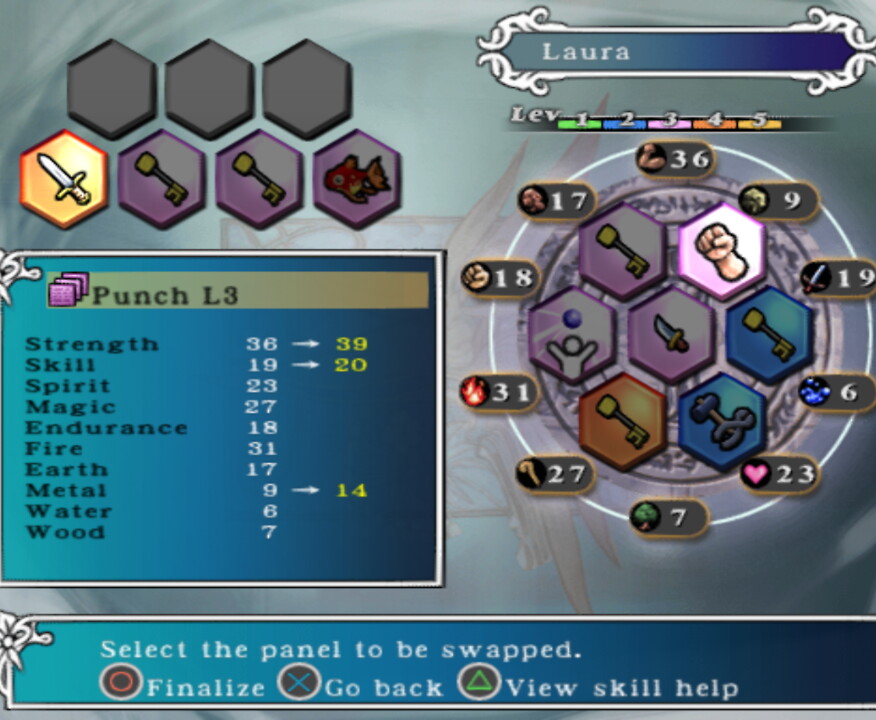
The Growth Panel is the primary way that characters grow in UNLIMITED:Saga. The Growth Panel consists of seven panel slots where Skill Panels may be placed when they are awarded at the end of an adventure or when using a Tetra Force. When a Skill Panel is placed on the Growth Panel, it not only gives the character the ability to use the corresponding Skill, but the Skill Panel influences the Ability and Elemental Levels of the character based on where it is placed.
Each Skill Panel has a set rate at which it influences each Ability Levels and Elemental Levels, and each panel slot on the Growth Panel also influences the nearby Ability and Elemental Levels at set rates. The influence is multiplied by the level of the Skill Panel being placed and the character's corresponding Ability and Elemental Makings.
Skill Panels may also be placed on the Growth Panel in certain formations to create bonuses that further raise the Ability and Elemental Levels of the character.
The Growth Panel may only hold seven total Skill Panels, and when one is placed on top of the other, it replaces it completely. The Skill from the replaced Skill Panel is lost and is no longer used in the calculation for the character's Levels. This means it is possible for a character's Levels to decrease when placing a new Skill Panel if the new one does not give as much gain to Levels as the old one.
Limitations
A Skill Panel will refuse to be placed on the Growth Panel if it violates any of these rules:
- No more than three Magic Tablets may be on a single character's Growth Panel at once.
- Identical Magic Tablets may not be on a single character's Growth Panel at once.
- No more than three Familiars may be on a single character's Growth Panel at once.
- Two of the same type of Familiar may not be on a single character's Growth Panel at once.
- Negative Panels (Phobia, Pacifist, Seal Weapon) may only be replaced by other Negative Panels.
- The Gauntlet Skill Panel cannot be replaced.
Basic Strategy
Once you get the hang of the Growth Panel, you will likely have long-term plans for your characters' Growth Panels from the beginning of the game. But before you become accustomed to it or if you don't have a clear idea of what direction you want to go with a certain character, it can be hard to tell what is a good decision for placing a new Skill Panel during Growth Panel development.
It can be frustrating to later want to place a panel to get some great Ability or Elemental growth but have to give up a valuable Skill in order to do so. To avoid this as much as you can, when you are placing a Skill you think you will want to hold on to for a while even if it doesn't necessarily help your Levels, try placing it in a neutral position on the Growth Panel. If you place it near a Level that you value highly, you may end up being tempted to overwrite it with a new Skill Panel later, forcing you to choose between the Skill and the Levels. This can include not just slots that affect the Level directly, but spots where a Formation Bonus needs to be created. If you think you might want to make a certain Formation Bonus, try not to put valuable skills in the way unless they will be part of the Formation.
Think of which Ability and Elemental Levels you're not going to focus on at all for that character, and designate a spot as a "dump" slot. There will be many times in which you are unhappy with all four of your Skill Panels you're able to choose from, and will have to place one you don't want. It can be very frustrating if this means getting rid of a valuable Skill or lowering important Levels. If you have a spot where you don't mind whatever goes there, these decisions will be much less difficult.
Don't worry about sticking to a strict plan for the entire game. It's tempting to imagine a perfect Growth Panel setup for a character, then be frustrated when you don't get many parts of it early on. Even if you get all of the Skill Panels you want early in the game, they will be low levels and you will need to get the higher level ones later anyway, so it's perfectly fine if your early-game setup is vastly different from your late-game setup. Focus on what you need for your party immediately, and eventually you will start sorting out each character into what you find optimal or desired. If you only focus on what you want later, you could end up with a underdeveloped mid-game characters or a lack of Skills you want because you threw them away because they were on the "wrong" character or didn't fit with a final plan.
 Level Formula
A character's Ability and Elemental Levels are calculated based on the character's Making, all of the Skill Panels placed on the Growth Panel, and any Formation Bonuses on the Growth Panel as follows:
[TotalPanelGrowth * (Making + 3) / 64 ] + Making + FormationBonus
TotalPanelGrowth refers to the contributing effect of all placed Skill Panels that affect the respective Level. A single Skill Panel's contribution to the TotalPanelGrowth is equal to [ PanelGrowthRate * PanelLevel * SlotGrowthRate ] where PanelGrowthRate refers to the placed Skill Panel's multiplier for either Ability Levels or Elemental Levels respective to the Level being calculated. These range from 10 to 95 depending on the Skill Panel. The Ability Growth and Elemental Growth for all Skill Panels can be viewed on the Skill Panel List. PanelLevel refers to the level refers ot the level of the Skill Panel, and SlotGrowthRate refers to how much the slot the Skill Panel is placed in affects the respective Level. The closer a slot on the Growth Panel is to the Level on the ring outside of it, the more it will allow the Level to grow there. A single slot will have a Growth Rate between 20% and 100%. Further details of how much each slot affects each Level can be found in the Growth Rates section below.
Making refers to the character's Ability or Elemental Making for the respective stat. Makings are unchanging and can be viewed from the Status Menu in-game. You can see a comparison of all characters' Ability and Elemental Makings on the Player Characters page. FormationBonus refers to any bonus to the respective level gained from any Formation Bonuses and Deciphered Magic Tablets on the character's Growth Panel. More information can be found in the Formation Bonus section below.
 Growth Rates
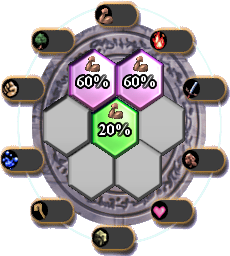
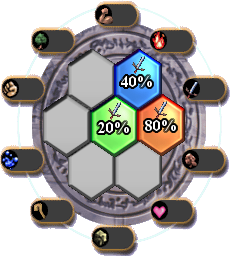
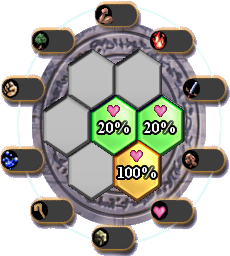
Each slot on the Growth Panel affects the Levels of the Abilities and Elementals near it on the outside ring. The center slot of the Growth Panel affects all Ability and Elemental Levels slightly. The two top panels and two bottom slots affect three different Levels each, while the two slots on the left and right sides affect four Levels each. A general idea of how much each Level is affected can be estimated by seeing how close the slot on the Growth Panel is to the Level icons on the ring outside of the Growth Panel.
Each character has one of five different layouts for their Growth Panel. Ability Levels will always be in the same place, but the Elemental Levels' positions will vary. The Elemental Levels' order will always go from Fire to Earth to Metal to Water to Wood clockwise around the ring, but the placement of the Levels will be rotated for each character. Which Levels are affected by each slot can be seen in the diagram to the right. Note that the Elementals' position are only an example; the Elemntal Level in the top right will be affected by the same slots as the Fire Level in the image, and all other Elemental Levels will be affected relatively, as well.
When calculating the Levels of a character, each slot affects its corresponding Skill Panel's contribution to the "TotalPanelGrowth" in the fomula described in the Level Formula section. The exact amount each space affects the constribution of Skill Panels on the Levels around them is as follows:
Ability Levels
Strength Level
Skill Level
Spirit Level
Magic Level
Endurance Level
Elemental Levels
Bottom
Elemental Level
Bottom-Left
Elemental Level
Top-Left
Elemental Level

Top-Right
Elemental Level
Bottom-Right
Elemental Level
Skill Panels
Sorted by Ability Growth
| Skill Panel | Ability Growth | Elemental Growth | Total Growth |
|---|---|---|---|
| Gauntlet | 95 | 15 | 110 |
| Iron Body | 90 | 20 | 110 |
| Seal Weapon (Gun) | 80 | 30 | 110 |
| Punch | 80 | 20 | 100 |
| Kick | 80 | 20 | 100 |
| Axe Arts | 80 | 20 | 100 |
| Toughness | 75 | 25 | 100 |
| Arcane Tongue | 70 | 50 | 120 |
| Magic Blender | 70 | 40 | 110 |
| Seal Weapon (Dagger) | 70 | 40 | 110 |
| Seal Weapon (Sword) | 70 | 40 | 110 |
| Seal Weapon (Staff) | 70 | 40 | 110 |
| Seal Weapon (Bow) | 70 | 40 | 110 |
| Throw | 70 | 30 | 100 |
| Sword Arts | 70 | 30 | 100 |
| Spear Arts | 70 | 30 | 100 |
| Master Fighter | 70 | 20 | 90 |
| Weapon Meister | 70 | 20 | 90 |
| Locksmith | 70 | 20 | 90 |
| Master Technician | 70 | 10 | 80 |
| Master Magician | 70 | 10 | 80 |
| Thrift Saver | 70 | 10 | 80 |
| Seal Martial Arts | 65 | 45 | 110 |
| Seal Weapon (Axe) | 65 | 45 | 110 |
| Seal Weapon (Spear) | 65 | 45 | 110 |
| Natural | 65 | 35 | 100 |
| Swimming | 65 | 25 | 90 |
| Defuse | 65 | 25 | 90 |
| Dagger Arts | 60 | 40 | 100 |
| Bow Arts | 60 | 40 | 100 |
| Shield Arts | 60 | 40 | 100 |
| Iron Will | 60 | 40 | 100 |
| Obstacle Crossing | 60 | 35 | 95 |
| Gun Arts | 60 | 20 | 80 |
| Quick-Fix | 60 | 20 | 80 |
| Adaptability | 55 | 45 | 100 |
| Weaponsmith | 55 | 25 | 80 |
| Acessory Smith | 55 | 25 | 80 |
| Pacifist | 50 | 55 | 105 |
| Aura | 50 | 40 | 90 |
| Monger | 50 | 30 | 80 |
| Staff Arts | 40 | 60 | 100 |
| Artiste | 40 | 40 | 80 |
| Phobia | 35 | 70 | 105 |
| Magic Tablet | 35 | 65 | 100 |
| Recovery | 30 | 70 | 100 |
| Architect | 30 | 60 | 90 |
| Sharpeye | 30 | 60 | 90 |
| Maharaja | 30 | 50 | 80 |
| Road Guide | 25 | 70 | 95 |
| Cave Guide | 25 | 70 | 95 |
| Eavesdrop | 25 | 65 | 90 |
| Fortuneteller | 20 | 80 | 100 |
| Diplomacy | 20 | 60 | 80 |
| Fire Familiar | 15 | 65 | 80 |
| Earth Familiar | 15 | 65 | 80 |
| Metal Familiar | 15 | 65 | 80 |
| Water Familiar | 15 | 65 | 80 |
| Wood Familiar | 15 | 65 | 80 |
| Inconspicuous | 15 | 65 | 80 |
| Fashion | 15 | 65 | 80 |
| Astraios | 10 | 70 | 80 |
| Atlas | 10 | 70 | 80 |
| Aigaion | 10 | 70 | 80 |
| Fortify | 10 | 50 | 60 |
Skill Panels
Sorted by Elemental Growth
| Skill Panel | Ability Growth | Elemental Growth | Total Growth |
|---|---|---|---|
| Fortuneteller | 20 | 80 | 100 |
| Phobia | 35 | 70 | 105 |
| Recovery | 30 | 70 | 100 |
| Road Guide | 25 | 70 | 95 |
| Cave Guide | 25 | 70 | 95 |
| Astraios | 10 | 70 | 80 |
| Atlas | 10 | 70 | 80 |
| Aigaion | 10 | 70 | 80 |
| Magic Tablet | 35 | 65 | 100 |
| Eavesdrop | 25 | 65 | 90 |
| Fire Familiar | 15 | 65 | 80 |
| Earth Familiar | 15 | 65 | 80 |
| Metal Familiar | 15 | 65 | 80 |
| Water Familiar | 15 | 65 | 80 |
| Wood Familiar | 15 | 65 | 80 |
| Inconspicuous | 15 | 65 | 80 |
| Fashion | 15 | 65 | 80 |
| Staff Arts | 40 | 60 | 100 |
| Architect | 30 | 60 | 90 |
| Sharpeye | 30 | 60 | 90 |
| Diplomacy | 20 | 60 | 80 |
| Pacifist | 50 | 55 | 105 |
| Arcane Tongue | 70 | 50 | 120 |
| Maharaja | 30 | 50 | 80 |
| Fortify | 10 | 50 | 60 |
| Seal Martial Arts | 65 | 45 | 110 |
| Seal Weapon (Axe) | 65 | 45 | 110 |
| Seal Weapon (Spear) | 65 | 45 | 110 |
| Adaptability | 55 | 45 | 100 |
| Magic Blender | 70 | 40 | 110 |
| Seal Weapon (Dagger) | 70 | 40 | 110 |
| Seal Weapon (Sword) | 70 | 40 | 110 |
| Seal Weapon (Staff) | 70 | 40 | 110 |
| Seal Weapon (Bow) | 70 | 40 | 110 |
| Dagger Arts | 60 | 40 | 100 |
| Bow Arts | 60 | 40 | 100 |
| Shield Arts | 60 | 40 | 100 |
| Iron Will | 60 | 40 | 100 |
| Aura | 50 | 40 | 90 |
| Artiste | 40 | 40 | 80 |
| Natural | 65 | 35 | 100 |
| Obstacle Crossing | 60 | 35 | 95 |
| Seal Weapon (Gun) | 80 | 30 | 110 |
| Throw | 70 | 30 | 100 |
| Sword Arts | 70 | 30 | 100 |
| Spear Arts | 70 | 30 | 100 |
| Monger | 50 | 30 | 80 |
| Toughness | 75 | 25 | 100 |
| Swimming | 65 | 25 | 90 |
| Defuse | 65 | 25 | 90 |
| Weaponsmith | 55 | 25 | 80 |
| Acessory Smith | 55 | 25 | 80 |
| Iron Body | 90 | 20 | 110 |
| Punch | 80 | 20 | 100 |
| Kick | 80 | 20 | 100 |
| Axe Arts | 80 | 20 | 100 |
| Master Fighter | 70 | 20 | 90 |
| Weapon Meister | 70 | 20 | 90 |
| Locksmith | 70 | 20 | 90 |
| Gun Arts | 60 | 20 | 80 |
| Quick-Fix | 60 | 20 | 80 |
| Gauntlet | 95 | 15 | 110 |
| Master Technician | 70 | 10 | 80 |
| Master Magician | 70 | 10 | 80 |
| Thrift Saver | 70 | 10 | 80 |
 Formation Bonus
Family Formation Bonuses
| Family | Skill Panels |  |
 |
 |
 |
 |
 |
 |
 |
 |
 |
|---|---|---|---|---|---|---|---|---|---|---|---|
| Martial Arts | Punch, Kick, Throw | +2 | - | - | +2 | - | - | - | - | - | - |
| Dagger Arts | Dagger Arts | - | +2 | +1 | +1 | - | - | - | - | - | - |
| Sword Arts | Sword Arts | +2 | +2 | - | - | - | - | - | - | - | - |
| Axe Arts | Axe Arts | +3 | - | - | +1 | - | - | - | - | - | - |
| Staff Arts | Staff Arts | - | - | - | +1 | +2 | - | - | - | - | - |
| Spear Arts | Spear Arts | +2 | - | - | +2 | - | - | - | - | - | - |
| Bow Arts | Bow Arts | +2 | +2 | - | - | - | - | - | - | - | - |
| Gun Arts* | Gun Arts | - | +4 | - | - | - | - | - | - | - | - |
| Physicality* | Iron Body, Fortify, Toughness, Recovery, Natural, Iron Will | - | - | - | +4 | - | - | - | - | - | - |
| Magic Study | Magic Tablet, Magic Blender | - | - | - | - | - | +1 | +1 | +1 | +1 | +1 |
| Familiars | Fire Familiar, Earth Familiar, Metal Familiar, Water Familiar, Wood Familiar | - | - | +3 | - | +1 | - | - | - | - | - |
| Judy's Familiars | Astraios, Aigaion, Atlas | - | - | +1 | - | +3 | - | - | - | - | - |
| Durability | Master Technician, Master Magician, Thrift Saver | - | +2 | - | - | +2 | - | - | - | - | - |
| Mastery | Master Fighter, Weapon Meister | +1 | +1 | - | +1 | +1 | - | - | - | - | - |
| Traveling | Road Guide, Cave Guide, Architect, Obstacle Crossing, Swimming, Adaptability | - | - | - | +2 | - | - | - | - | +2 | - |
| Fine Sense | Eavesdrop, Aura, Sharpeye, Defuse, Locksmith | - | +2 | - | - | - | - | +2 | - | - | - |
| Negotiation | Monger, Maharaja, Diplomacy, Inconspicuous, Fashion | - | - | - | - | +2 | - | - | - | - | +2 |
| Artistry | Artiste, Quick-Fix, Weaponsmith, Accessory Smith | - | +3 | - | - | - | - | - | +2 | - | - |
| Mystic | Fortuneteller, Arcane Tongue | - | - | +3 | - | - | +2 | - | - | - | - |
| Phobia* | Any Phobia | +2 | - | +6 | - | - | - | - | - | - | - |
| Pacifist | Any Pacifist | - | - | +3 | - | +2 | - | - | - | - | - |
| Seal Weapon* | Any Seal Weapon | +2 | - | - | - | +4 | - | - | - | - | - |
| Family | Skill Panels | |
|
|
|
|
|
|
|
|
|
*Gun Arts gives SKI+4.5 in Triangle
*Physicality gives END+4.5 in Triangle
*Phobia gives STR+2/MAG+4.5 in Triangle and STR+2/MAG+4 in Line
*Seal Weapon gives STR+2/SPI+4.5 in Triangle
When Skill Panels of the same family are arranged in certain patterns called Formations, they will provide a bonus to Levels depending on the family called a Formation Bonus. Skill Panels in the same family have the same picture icon on their Panels; the only exception to this is that Judy's Familiars are considered a different family from other Familiars.
The shape of the Formations will multiply the bonus given. If all of the Skill Panels in the Formation are the same level, the boosted Ability and Elemental Levels for that Formation will gain an additional bonus equal to the shared level of the Skill Panels.
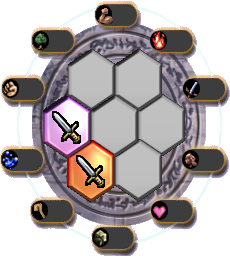
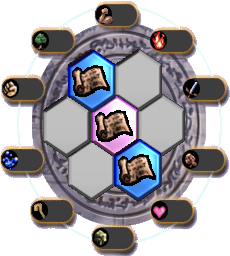
There are three types of Formations that give bonuses. The most simple Formation is the Joint Formation which requires only two Skill Panels be side-by-side on the outer edge of the Growth Panel. The center slot is never part of a Joint Formation. Joint Formation doesn't give any additional boost to Levels beyond the basic Formation Bonus from the Skill Panels' family. Because only two Panels are used, however, you can fit up to three of them at once on the Growth Panel, or save room for other Skills you want on your Growth Panel.
Examples:
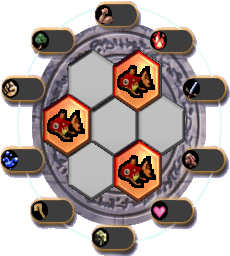
A second type of Formation is the Triangle Formation, which consists of three Skill Panels on outer corners of the Growth Panel that do not touch. The Triangle Formation gives two times the family's normal bonus to Levels. It can be difficult to arrange, but it importantly leaves the center slot open for use. Because of its shape, there are only two possible configurations for a Triangle Formation, but both can be used at the same time.
Examples:
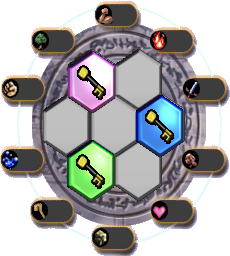
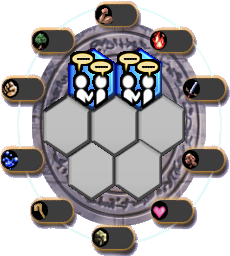
The last type of Formation is the Line Formation. This formation is created by placing two Panels at opposite corners of the Growth Panel and one Panel in the center slot, forming a "line" across the center. Because of its shape, only one Line Formation can be created on a single Growth Panel at once, but it provides three times the normal family bonus to Levels from the Formation. They also leave corners of the Growth Panel open to adding additional Joint Formations, making Line Formations often the most powerful of the Formations.
Examples:
Deciphered Magic Tablet Bonus
In addition to regular Formation Bonuses, an additional bonus can be obtained by having a Deciphered Magic Tablet on a character's Growth Panel. A Magic Tablet counts as Deciphered when the character knows all of the Magic Arts available from the given tablet. Placing a Magic Tablet as a Skill Panel that only contains Arts a character already knows will mean the Magic Tablet is automatically Deciphered; no actual learning needs to take place if the Arts are all already known.
A Deciphered Magic Tablet of any of the five normal Elemental schools will give a bonus of +2 to both Magic and Spirit as well as a bonus to the corresponding Elemental Level equal to the Deciphered Tablet's level. A Forbidden Arts Magic Tablet will give +5 to Magic Level and an additional bonus to Magic Level equal to the Tablet's level.
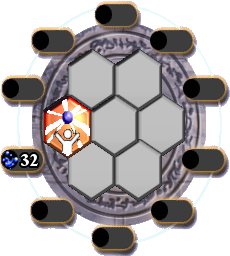
 Growth Example
This example is provided to help you understand how Levels are determined using the Growth Panel and Formation Bonuses.
Let's imagine that we would like to raise Armic's Water Level so that he can deal more damage with arts like Bubble Blow and Ice Needle and recover more HP with Purify.
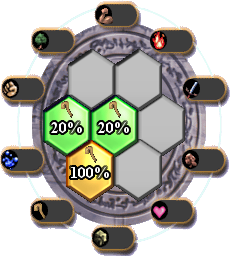
Water Level is an Elemental Level, so we'll need to focus on Elemental Growth, not Ability Growth. Fortuneteller is a great Skill Panel for raising Elemental Levels because it has Elemental Growth of 80, the highest Elemental Growth of any Skill Panel in the game.
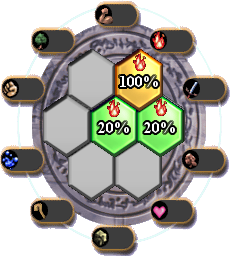
Armic's Water Level is in the Bottom-Left corner of the ring around the Growth Panel. The Growth Rates by slot for the Bottom-Left Ability Level look like this:
The effect of the far left panel slot on the Growth Panel seems to be the most effective at raising this Elemental Level, so let's put our Fortuneteller Skill Panel there. We'll assume we just got a L4 Skill Panel at the end of an adventure.
Calculating with a single Panel
To determine how much our Fortuneteller Skill Panel will contribute to Armic's overall Water Level, we can use this formula:
[ PanelGrowthRate * PanelLevel * SlotGrowthRate ]
In our case, the Panel Growth Rate refers to the Elemental Growth Rate of the Fortuneteller Panel, which is 80. The Panel Level is L4. The Slot Growth Rate of the left slot is 80%. So our calculation will be [ 80 * 4 * 0.8 ] for a total of 256.
If there were no other Panels at all on Armic's Growth Panel, this would be the total contribution of all Skill Panels toward his Water Level, and we could calculate it now. The formula to calculate his final Water Level is:
[ TotalPanelGrowth * (Making + 3) / 64 ] + Making + FormationBonus
Our Total Panel Growth is 256 as we have already found out. Armic's Water Making is 4, the highest an Elemental Making can be. Since we only have a theoretical one Panel, we can't have any Formation Bonus, so our final calculation will be { [ 256 * ( 4 + 3 ) / 64 ] + 4 + 0 } giving us a final Water Level of 32. That's pretty good for just one Panel on the Growth Panel.
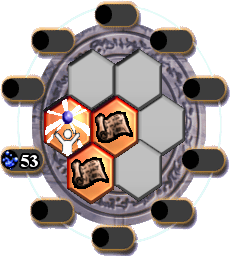
Calculating all Panels' contribution
Of course, such a situation is impossible without cheating, as there will always be more than one Skill Panel on Armic's Growth Panel. But since the contribution of a Skill Panel to any Ability or Elemental Level can't be negative, that only means our Water Level is guaranteed to be higher than 32 based on the other Panels!
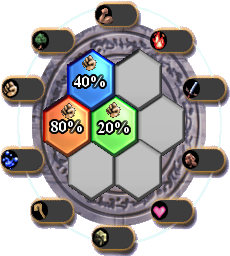
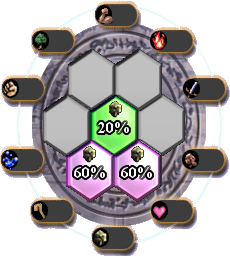
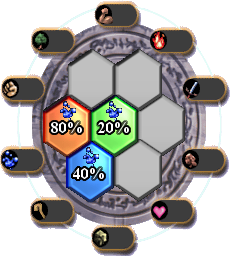
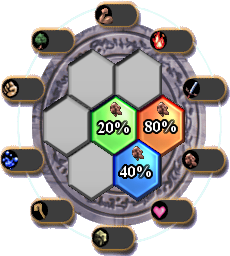
The other two slots that affect Water Level are the bottom-left slot, which has a 40% effect, and the center slot, which has a 20% effect. Let's try putting Cave Guide and Road Guide in those slots. Both Cave Guide and Road Guide have an Elemental Growth Rate of 75, so either can go in either slot and the final result will be the same, as long as both are the same level. We'll assume yet again we're using L4 Skill Panels.
The center slot has a 20% Growth Rate, so we can find the contribution of Road Guide or Cave Guide toward Water Level Growth there with [ 75 * 4 * 0.2 ], giving us a contribution of 60. Even though Cave Guide and Road Guide have a 75 Elemental Growth and Fortuneteller has 80, the difference between the contribution is huge because the center slot only allows 20% of the Elemental Growth to actually contribute to Water Level, while the left slot allowed for 80%. We can similarly find the contribution of either Guide Skill Panel in the bottom left slot with [ 75 * 4 * 0.4 ], giving us a contribution of 120.
Together, our three panels contribute 256 + 80 + 120 , or 456, toward the final calculation. So we can figure out our Water Level with { [ 456 * ( 4 + 3 ) / 64 ] + 4 + 0 } , bringing our Water Level to 53.875. The game will always round down, so Armic's Water Level with these three panels will be 53. Very nice!
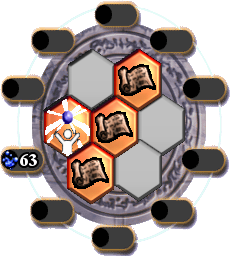
Using Formation Bonus
There are only three panel slots on the Growth Panel that affect Water Level, as with any Level, so we can't directly influence Water Level any more with Skill Panels' Elemental Growth Rates. But we can still try to push the Water Level a bit higher by making use of Formation Bonuses. We've already started toward a Line Formation with the Traveling Skills using Cave Guide and Road Guide. The Formation Bonus for Traveling Skill Panels is +2 to both Endurance and Water Levels. If we put any of the Traveling Skill Panels in the top right slot, it will form a Line Formation and we can get a bonus. Let's say we're using Swimming, since that's one of Armic's natural abilities, and again, we'll say it's another L4 Skill Panel.
The Line Formation Bonus gives us three times the normal Bonus Growth to Levels, so that means instead of +2 to Water and Endurance, we'll be receiving +6. And because all three of our Skill Panels in the Formation are the same level, we get an additional Bonus equal to that level, which is +4, making our total Bonus from this Line Formation +10.
So instead of a Water Level of 53, we've now managed to get a Water Level of 63!
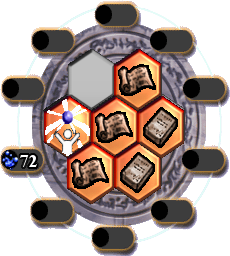
Using Magic Tablet Bonus
We still have room on the Growth Panel, so we can try to squeeze out as much Water Level as we can by using a combination of the Deciphered Magic Tablet Bonus and a Joint Formation Bonus. A Joint Formation bonus with two Magic Tablets will give us +1 in all Elemental Levels, and having Deciphered Magic Tablets will give us +2 in Spirit and Magic Levels and growth in the Elemental Level that matches the Tablet's Element equal to the Tablet's Level.
If we had a Deciphered Diva Madini's Magic Tablet (which is a L4 Tablet of the Water Element), we would get +2 to Spirit and Magic and +4 to Water, for example. That +4 would be very helpful, so let's give Armic that Tablet and have him learn all the Magic Arts from it so we can get the bonus.
Then we can do the same with another Magic Tablet of L4. Since we can't have two identical Tablets, another L4 Tablet would have to be of another Element, so we won't get a +4 Water Level Bonus from it. But, by having two L4 Magic Tablets next to each other in a Joint Formation, we'll get +1 to all Elemental Levels, with an additional +4 to all Elemental Levels since the Tablets are both L4. This means the Joint Formation Bonus will give us +5 to Water Level and our Deciphered Diva Madini's Magic Tablet will give us +4 to Water Level. Added to our Formation Bonus of +10 from the three Traveling Panels we placed previously, our total Formation Bonus comes to +19!
This means our total Water Level is going to be 72. This is a ridiculously high Water Level.
Conclusion
The purpose of this example was to show how an individual Level is calculated based on the current position of Skill Panels on the Growth Panel. We only focused on a single Level, though, ignoring all other attributes of the character. We didn't get to focus on growing Armic's Metal Level, when he has a Metal Making of 3. His Strength Making of 3 also went ignored completely, and with all of our panels focusing on Elemental Growth, it would probably end up very low. Armic has 5 Endurance Making, which is very high, but we managed to keep his Endurance Level fairly low with our setup. We also didn't put any thought into which Skills would be useful for Armic, so we're stuck with two Magic Tablets that do nothing, Fortuneteller, and some exploration skills. We have no Weapon or Martial Arts Skill Panels at all, so Armic will not be good at any type of fighting except using Water Arts, which are very limited in offensive capabilities.
If we wanted to build Armic solely to use Water Arts in battle and nothing else at all, this might not be a bad idea. But as you can see, building well-rounded and useful characters will require a lot more thought than focusing on a single aspect like Water Level. Understanding how each Level is calculated, though, should help you make better choices when placing Skill Panels on the Growth Panel.